My First Car

Zoo, how are you doing the seams? I admit to having trouble getting them right.

Hi Greg, my technique is still a bit rough but I will share what I've done.
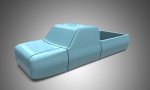
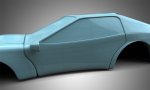
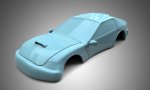
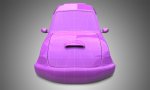
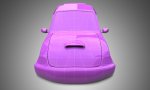
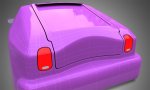
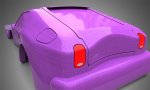
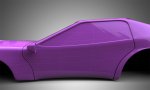
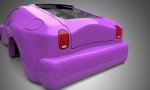
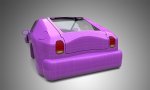
I made a quick pickup truck model, it's pretty square so it's easier to work with.
I also made the seams fairly wide to facilitate closer scrutiny,
it's difficult looking down the "trench" if it's too small.

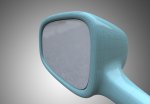
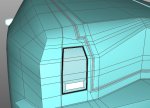
I use Cover and Normal Move with an offset of -.002, and I keep clicking until it's
as deep as I need. Then a lot of Ring Cuts and tweaking to control the corner radii.

Check out the model and if anyone has any questions, please feel free to ask.


Attachments

  • Seam Truck.jpg
    Seam Truck.jpg
    78 KB · Views: 611
  • Seam Truck02.jas.zip
    37.8 KB · Views: 444
You're too kind zoohead :redface:
I think the level of your renders and your models here in the forum is great
I also really like the fact that in all your threads you share your methods and tricks with us all.
The only advice I feel I can give you here is to tighten the gaps between the various parts of the body, in my opinion are far too big and spoil the beautiful model.
For the details, it just takes patience :frown:
To my Ferrari Enzo I analyzed photos of reference giving an order (from nose to tail) to the details that I was going to add .. losing myself occasionally to the desire to create details that struck my interest or to reshape parts that previously looks different.

Great job :icon_thumbup::icon_thumbup:
I'm curious to see what kind of wheels you will use :cool:
... and of course the finished car
Have Fun!
 

Thanks WEEDO, you're words of wisdom and encouragement are very much appreciated.
I intentionally made gaps big to make the job a little easier, I'm
hoping to tighten them up and next time go with tighter spacing.

The wheel I made was a problem because it's a five lug into seven spokes split into fourteen.:frown:


Attachments

  • Custom Wheel01.jpg
    Custom Wheel01.jpg
    68.8 KB · Views: 597

I started tightening up my door seams, as you can see the one on the right is done
and looks so much better than the one on the left.

I'm working on a tutorial on door gap seams that should be done in the near future.


Attachments

  • MyFirstCar05.jpg
    MyFirstCar05.jpg
    96.8 KB · Views: 564

I'm getting there, a little at a time. My eyes are burning now so it's time to stop for the night.


Attachments

  • MyFirstCar06.jpg
    MyFirstCar06.jpg
    101.5 KB · Views: 591

Ok, I'm satisfied with the hood seam, now to make the hatchback seam.

I make three "lanes" with Inner Extrude, the center lane will be the "trench".

The other two edges, control the radius of the corner of the trench.

Then Cover, Normal Move stopping the same distance down as the width of one of the lanes.

Cover again and Normal Move to the final depth.

The two edges at the bottom of the trench get a Crease to save on polygons,

I usually use a lot of polys so I save them when I can.


Attachments

  • MyFirstCar08.jpg
    MyFirstCar08.jpg
    105.2 KB · Views: 563
  • Hatchback Seam01.jpg
    Hatchback Seam01.jpg
    159 KB · Views: 572

This is my first real attempt to build a car in Cheetah, or any other 3D program for that mater.
I'm thoroughly enjoying this one so I thought I'd post my progress.​

This is really great. Any chance we can talk you into sharing your process from a blank workspace to this stage?
 

The hatchback seam worked great. I think I've developed a method from my madness.

And how cool is this texture for preview rendering.
I can change the thickness of the lines for closeups or distant shots.


Attachments

  • MyFirstCar09.jpg
    MyFirstCar09.jpg
    153.7 KB · Views: 574

Gas cap cover and a hard line around the bumper using a Crease.


Attachments

  • MyFirstCar10.jpg
    MyFirstCar10.jpg
    157.7 KB · Views: 561

I'm going to need air conditioning in this car, there's no way to roll the window down! :redface:

Make a note: Design car doors so the window will at least look like it fits.


Attachments

  • Window problem.jpg
    Window problem.jpg
    95.8 KB · Views: 541

I'm trying to achieve a more realistic lens effect in the tail light.

This is a step in the right direction I think, but it still needs some work.


Attachments

  • Tail Lights.jpg
    Tail Lights.jpg
    134.5 KB · Views: 541
The car is looking great! One thing comes to mind looking at your car and thinking about what I would try... Can we do a gradient tint over a dielectric / glass shader the way some windows look partially tinted at the extremes? Something I'll have to play around with when I get the car building bug. :)
 
The car is looking great! One thing comes to mind looking at your car and thinking about what I would try... Can we do a gradient tint over a dielectric / glass shader the way some windows look partially tinted at the extremes? Something I'll have to play around with when I get the car building bug. :)

Thanks icodealot, that's a tricky one I haven't been able to do.
Luckily we have Frank to help us. :icon_thumbup:


Here's a preview of the vehicle for the tutorial.

I went with a more box shaped vehicle because My First Car
required to much tedious tweaking and fiddling for a tutorial.


Attachments

  • RV01.jpg
    RV01.jpg
    125.9 KB · Views: 501
  • RV02.jpg
    RV02.jpg
    122.9 KB · Views: 508
Back
Top