How to model a seam to an object?

How to model a seam to an object?

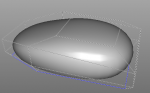
I am currently trying to model a computer mouse. This is the body so far:

attachment.php


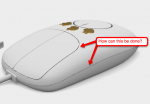
How can I now add these smooth seams of the two body shells and the mouse buttons as shown in this free 3d model, please?


Attachments

  • mousebody.png
    mousebody.png
    56.9 KB · Views: 1,463
  • oldmouse.png
    oldmouse.png
    82.4 KB · Views: 1,350
You could

A) use Bumpmaps - but you have to UVMap your Model carefully to avoid distortion

B) Model the insets by double/triple/"count to n" :tongue: inner extrusion and moving the polys inwards where you want.

C) Use a NURBS Modeler :p :cool:

regards,
Sebastian
 
Last edited:
Here's a file on how I know how to do a seam. I'm not the best modeler, so I can't help you with the other buttons, but if you can get the polys put where you want them, I imagine the method would be the same.

1. In edge mode, select the edge where you want the seam to be, then inner extrude (just a little)
2. In polygon mode, ring select the 2 new rows of polygons that the inner extrude created
3. 'Cover' and normal move inward to suit.
4. Toggle crease the appropriate edges

Not a total solution, but it might help get you started.

Erin
 

Attachments

  • Mouse seam.jpg
    Mouse seam.jpg
    20.6 KB · Views: 840
  • Mouse seam.jas.zip
    9.2 KB · Views: 354
Sebastian's option B / Erin's suggestion is the way to go if you're box modeling.

A more concrete version would be to block out the basic shape you're after (using box-modeling and subdiv) until you're happy with the shape. (Don't use anything more than the minimum level of subdivision that makes the basic shape correct.)

Then, apply the subdivision and find the seams you want (if they're there) or add them with the scalpel (if they're not). Then select the seams and inner extrude — you'll want to normal move them or do some funky stuff to move them inwards after the extrude. Now make the seams and the edges running parallel to them creases and apply more subdivision.

Sebastian's option C, NURBS modeling is the way to get exactly what you want in the most direct possible way, but that means using a tool with real NURBS support.
 
...block out the basic shape you're after (using box-modeling and subdiv) until you're happy with the shape. (Don't use anything more than the minimum level of subdivision that makes the basic shape correct.)

Then, apply the subdivision and find the seams you want (if they're there) or add them with the scalpel (if they're not).

Then select the seams and inner extrude — you'll want to normal move them or do some funky stuff to move them inwards after the extrude. Now make the seams and the edges running parallel to them creases and apply more subdivision.

Podperson is right. This is the rock-solid poly-modeling approach.

It surely depends on the rendered image size and usage if you could perhaps get away with bump or normal maps for a fast hack. :rolleyes:
 
Thank you for all your support.

I now get the seam around the object but the mouse buttons seems to be "unsolvable" for me or my skills.

I had a peek at Youtube about NURBS and it really seems to be the tool for my specific need right now. But I can't to take the massive learning curve for another tool for this one task. NURBS looks appealing though, just like "Adobe Illustrator" in 3D. Just curious, any plans to have that in C3D any time "soon"? I mean, is it on any higher position in the wishlist?
 
Just curious, any plans to have that in C3D any time "soon"? I mean, is it on any higher position in the wishlist?
Not that I know of - and you´ll need a whole other render engine to render NURBS curves. Pretty sure Cheetah3d stays as a subdivsion surface modeler.

Cheers
Frank
 
Hi!

I don't think we'll see real nurbs in Cheetah anytime soon, it's a totally different approach. It can be done in poly modeling quite easily if you arrange your topology in "loops" instead of "grid", as per organic models.

Now I'm not best organic modeler around and I'm pretty sure there are better or more efficient ways but the attached sketch should give you an idea of what I'm talking about...

cheers,
Alessandro
 

Attachments

  • mouse_topology.jpg
    mouse_topology.jpg
    64.5 KB · Views: 796
Thanks, but ouch, "organic modelling" seems to be substantially more complicated compared to my simple box. Far out of my skills.

Too bad that the polynom count of the free original model is too low and produces edgy render images.
 
don't give up so easily, it's not that difficult...

check this quick (and partial) example but don't mind the overall shape.
I started with a box, ringcut, merged some vertex, deleted unnecessary edges, ringcut or bevel, extrude, creased edges...

cheers,
Alessandro

Edit: woops, seems I forgot to weld 2 vertex at the corner, leaving 2 evil tris... I'd suggest to tune everything to shape before beveling and creating the seams, btw
 

Attachments

  • mouse_topology.jpg
    mouse_topology.jpg
    58.2 KB · Views: 799
  • Mouse_topology.jas.zip
    12 KB · Views: 321
Last edited:
Too bad that the polynom count of the free original model is too low and produces edgy render images.
I think you could start with a simple 6 sided disc object, cut into half, add geometry at the edges via cover tool or create polygons by using the model as a blueprint and let it snap to the surface of the underlying mouse.
PCMaus.jpeg

Cheers
Frank
 
Last edited:
I'm not understanding this part of it. How do you 'snap to the surface'?
Place the new geometrie/mesh above the blueprint "object" (not the blueprint scene object ;) )
Grab the "move tool", go in point mode, uncheck "automode, Snapping=surface. Now select a point of the new geometrie and drag the "green" arrow and drag down til the cursor hits the surface. For example.
If it´s not clear I can make a short video clip on this later.

Cheers
Frank
 
Thanks Frank.
I did manage to come up with something. I had the new geometry as a separate object (duh). I dragged it into the first, imported children then did the snapping. I hope that's correct (it seemed to work).
This method is going to come in very handy :icon_thumbup:

Erin
P.S.
if you have the time, a little video never hurt anyone;)

It´ll work with separate meshes; you don´t have to "import children".

Cheers
Frank
 
Back
Top