Joel
0
- Messages
- 340
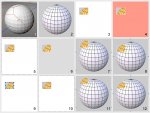
Partial-area render window
Edit: 4-20-2016
Please see New Improved process in reply below. Photoshop is good for saving and manipulating layers, but it's expensive and uses computer resources best devoted to C3D. Preview is cheap, lightweight, and can work alongside C3D.
Using Cheetah 3D and Photoshop simultaneously
The request for a partial-area render tool has been a “Must-Have” on the forum Wish List thread for around seven years. Here is my best guess at a work-around, by having Photoshop open while working in C3D. The idea for the window originated with Frank Beckmann. I have extended the idea by incorporating Photoshop, and tried to reduce the implementation down to step-by-step directions, primarily for the benefit of beginners. It takes a few minutes to set up the first time, but then it will be ready whenever you face the all-too-typical situation where you are doing test renders and only need to inspect or tweak a small area of the render. By having this capability you can save hours of wasted time waiting for high-resolution whole-picture test renders. Usually there is a trade-off between high quality and fast speed. Until C3D incorporates a partial-area render tool, this allows you to effectively utilize Photoshop as a side-tool to get fast feedback on work in progress, because it practically automates the process. It also enhances quality, by stacking multiple test renders in layers, so that you can click back and forth to compare them, zoomed in if you want.
It may be that Version 7 will be released in the near future, and have this tool built in. But meanwhile, for anyone using Version 6, this might serve the purpose. Suggestions and corrections are welcome. I’m posting it in the Tutorials thread, but it’s more like a time-saving tip, broken down (so you won’t waste time trying to use a time-saving tip).
Frank Beckmann’s Passe-partout Rendering window:
http://www.cheetah3d.com/forum/showthread.php?t=7084
Cheetah 3D:
One-time easy preparation of the Window plane:
Collapse a 1 X 1 plane, inner extrude, delete the center polygon
Material: White (or other color that doesn’t appear in the partial render): Diffuse & Emissive
Black: Specular, Reflection, & Transparency
Mode tag: Visible in editor; Visible in renderer, Editor shading = Wire
Render tag: only check Visible for primary rays (uncheck to render the entire picture)
Copy and paste the camera’s coordinates into the plane’s coordinates
Rotate the Y axis 90°, adjust the distance from the camera
Make the window plane the child of the camera
Save the file: Users/[you]/Library/Application Support/Cheetah 3D/Samples/Rendering
Re-use it in every future C3D picture
Open the Window.jas file before starting a new picture, copy the camera/window,
Open the new file; paste the camera/window
All settings and materials will be ready to use, with the window “attached” to the camera
In Edge mode, ring select the edges of the window opening
Use the Transform tool to frame the area to be rendered
Save the full-picture render, then copy the partial render to the clipboard
Photoshop:
Open the full-picture render
Paste the partial render copy over it; Blend mode = Normal
Name the layer according to the C3D settings so you remember what you tried out
Use the Magic Wand selection tool: tolerance around 0 (white) to 8 (red, etc.); Anti-alias unchecked, contiguous checked
Select surrounding color — make sure the selection is uniform and complete, with no excluded “sparkling” pixels
Select/Modify/Expand: one pixel (the edge of the partial render has a one-pixel blur)
Delete the surrounding color; maybe use command-H to hide the selection outlines
Stack multiple partial renders in Layers, click the “eyes” to compare different partial renders
Save the layers in a Photoshop file, or Flatten the layers for a finished picture
Last edited: