
You are using an out of date browser. It may not display this or other websites correctly.
You should upgrade or use an alternative browser.
You should upgrade or use an alternative browser.
Terrain
- Thread starter Eureka!
- Start date
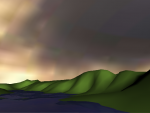
Hi Eureka, Hi Martin.
This is not a tutorial - just a quick hack.
Start with a plane, divide in sections about 150x150. Throw in Displace-modifier, load a greyscale bitmap, adjust the offset and put in some material with a texture and a bump and some beautyful lightsettings an/or the fog tag and ................. have fun.
Ok - there´s no atmosphere simulation, but a nice illustration comes through.
I attached a simple zipped elevation file, I had at hand for a quick start.

With kindest regards,
Frank
This is not a tutorial - just a quick hack.
Start with a plane, divide in sections about 150x150. Throw in Displace-modifier, load a greyscale bitmap, adjust the offset and put in some material with a texture and a bump and some beautyful lightsettings an/or the fog tag and ................. have fun.
Ok - there´s no atmosphere simulation, but a nice illustration comes through.
I attached a simple zipped elevation file, I had at hand for a quick start.
With kindest regards,
Frank
Attachments
Last edited:
Jake
0
Very nice Frank. Beautiful image.
Eureka. I do a similar thing. I load a jpeg of a contour into photoshop and paint with the airbrush lighter to darker depending on the contours. I assign different grey tones to each elevation change. After it is painted in then I use the blur tool to smooth out the values between contours, then do what Frank does. Not absolutely accurate, but close enough for most work.
Eureka. I do a similar thing. I load a jpeg of a contour into photoshop and paint with the airbrush lighter to darker depending on the contours. I assign different grey tones to each elevation change. After it is painted in then I use the blur tool to smooth out the values between contours, then do what Frank does. Not absolutely accurate, but close enough for most work.
Eureka!
0
Frank,
I just tried it and it didn't turn out to be a 3D land scape. Am I supposed to use the magnet tool to make it 3D? When you were done with yours did you turn out with a 3D landscape or just a photo. By the way I'm still learning how to use Cheetah3D so my questions may seem kind of dumb (I'm 12)") .
.
Thanks a lot,
Eureka!
I just tried it and it didn't turn out to be a 3D land scape. Am I supposed to use the magnet tool to make it 3D? When you were done with yours did you turn out with a 3D landscape or just a photo. By the way I'm still learning how to use Cheetah3D so my questions may seem kind of dumb (I'm 12)
.Thanks a lot,
Eureka!
Hi Eureka.
Can you be more specific? You have to increase the offset of the displace-modifier - in my case it was about 0,5. I didn´t use the magnettool here.
Otherwise post your try or send it via email.
Thanx,
Franx
Can you be more specific? You have to increase the offset of the displace-modifier - in my case it was about 0,5. I didn´t use the magnettool here.
Otherwise post your try or send it via email.
Thanx,
Franx
Lesson 1
Hi Eureka.
Maybe something lost in translation. So here are the steps. Don´t miss one and post your result, ok?

Bye,
Frank
Hi Eureka.
Maybe something lost in translation. So here are the steps. Don´t miss one and post your result, ok?
Bye,
Frank
Last edited:
Hi Eureka, Greg?
Mmmmmmmmmh, I think there´s just one tiny little thing missing. Maybe you have to increase the offset for a clearer elevation or whatever. So I would like to send you a Cheetah3d-file with all necessary parts.
My steps in slowmotion were:
1. Create a plane
2. Scale x and z=3.0
3. sections width 50 and sections depth 50
4. Put in the "Displace-modifier"
5. Load the texture "Elevation.jpg", increase "offset"
(that´s the point you MUST see an 3 dimensional terrain - maybe a bit flat, but by setting the offset higher the hills were growing up
6. Add material and load "texture.jpg" as texture and "BumpMapGrey.jpg" in Bump mapping.
In addition shut down cameralight in camera in objectbrowser and place a pointlight somewhere.
I think, that´s it.
In the folder there´s a screenshot of Bryce to see, how the "Elevation.jpg" works. It said; the lighter the colour (greys), the higher the terrain.
I´m hoping still you might follow these steps successfully, so that we can see your first terrain render.
Any questions? Don´t hesitate.
With kindest regards
Frank
PS.: Ooooops; all I need is a valid e-mailadress from you
Eureka!
0
It worked!!!!!!
Hi Frank (Yea it's Greg),
Yeeeeeeeeeeeesss!!! . It worked.I got it looking 3D. it's not looking super realistic yet (it's not smooth yet, it's spiked), but I could use the subdivision modifier. I just gave it a quick try though and it doesn't look as good as yours yet. I'll keep trying.
I'll email you my email address to you. I don't know how to post photos.
Thanks so much !!
Eureka.
Hi Frank (Yea it's Greg),
Yeeeeeeeeeeeesss!!!
. It worked.I got it looking 3D. it's not looking super realistic yet (it's not smooth yet, it's spiked), but I could use the subdivision modifier. I just gave it a quick try though and it doesn't look as good as yours yet. I'll keep trying.I'll email you my email address to you. I don't know how to post photos.
Thanks so much
!!Eureka.
Hi Eureka.
If it´s not that smooth you don´t need more polygons; go to "plane" and choose "phong" instead of "constraint". Look much better yeah?
With kindest regards
Frank
If it´s not that smooth you don´t need more polygons; go to "plane" and choose "phong" instead of "constraint". Look much better yeah?
With kindest regards
Frank
Hi Eureka!
Posting pictures should be easy. Click "new reply" and follow "additional options" to "manage attachments". A new window will open. Localize the files you want to share on your harddisk, LAN or wherever and "upload" them. Add a comment and hit "submit" - that´s it.
Have a try
With kindest regards
Frank

Hi Eureka!
Impressing. Very nice illustration. Keep it going. (For example: 600heighx360width, put in some text; nice bookcover)
Frank
Impressing. Very nice illustration. Keep it going. (For example: 600heighx360width, put in some text; nice bookcover
)Frank
Eureka!
0
Hello Frank,
I'm sorry I didn't get my post up before now (I've been really busy ).
My terrain still doesn't look realistic. How did you get yours looking so real that if you showed it to someone who didn't know it was done with Cheetah, they would think it was real? What did you do that made it look so good?
Anyway, here are my attempts.
Thanks!
Eureka.
PS. Any comments are appreciated.
I'm sorry I didn't get my post up before now (I've been really busy
).My terrain still doesn't look realistic. How did you get yours looking so real that if you showed it to someone who didn't know it was done with Cheetah, they would think it was real
? What did you do that made it look so good?Anyway, here are my attempts.
Thanks!
Eureka.
PS. Any comments are appreciated.
Attachments

Hi Eureka, Hi Martin.
This is not a tutorial - just a quick hack.
Start with a plane, divide in sections about 150x150. Throw in Displace-modifier, load a greyscale bitmap, adjust the offset and put in some material with a texture and a bump and some beautyful lightsettings an/or the fog tag and ................. have fun.
Ok - there´s no atmosphere simulation, but a nice illustration comes through.
I attached a simple zipped elevation file, I had at hand for a quick start.
With kindest regards,
Frank
Very coooool :icon_thumbup: