UV mapping

UV mapping

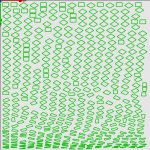
I'm having trouble with the UV mapping. I was using the pig tutorial but on one of my own models.

Wherever I put the seams or whatever I try, the unwrap splits every face into a separate section and sticks them in the same, very useless patten at funny angles and really inefficiently. It ignores my seams except to colour the edges of the split faces green which is the only way to tell which one is which.

Also, the square it unwraps into is tiny. How do you make it bigger?

I'm totally at sea. It's the demo, does it work in the demo?
Thanks.
 
I'm totally at sea. It's the demo, does it work in the demo?
Thanks.

It´s working in the demo as well.
Seems you were setting seams per polygon:p
then a sphere would look like this:

Any screenshot to share?

Cheers
Frank
 

Attachments

  • SphereFaces.jpg
    SphereFaces.jpg
    131.7 KB · Views: 1,333
Hi Frank,

I wasn't selecting all vertices as seams but that's what I'm getting.

First image just selecting model. Second image after selecting vertices of section of model and creating a seam.
 

Attachments

  • cheetah.jpg
    cheetah.jpg
    125.2 KB · Views: 1,357
  • withseams.jpg
    withseams.jpg
    141 KB · Views: 1,362
You can try another way without setting seams but UV unwrapped via polygon selection.
First clear all seams, then select a bunch after bunch of polys you want to be unwrapped.

Cheers
Frank
 

Attachments

  • UnwrapViaPolySelection.jpeg
    UnwrapViaPolySelection.jpeg
    49.6 KB · Views: 1,356
Yes, I have, but I just get the same result no matter what. Here is the result when I selected some polygons. And WHY does it keep putting the faces at an angle?
Also I can't figure out how to clear the seams so I have to start over from scratch every time.

Thanks Frank.
 

Attachments

  • selectpolygons.jpg
    selectpolygons.jpg
    117.9 KB · Views: 1,334
Last edited:
Mmmh - strange.
I attached my file - hopefully it bring in some light.

Cheers
Frank

Edit: Clearing seams: BMB click: select all seams-> toggle seams
 

Attachments

  • PolyUnwrap.jas.zip
    5.8 KB · Views: 504
Last edited:
Funny thing. I just finished authoring a basic tutorial on this a few days ago. It doesn't cover seams like it should, so I wasn't going to post it, but it does cover how to adjust the map to fit various parts of the unwrapped mesh. It can be found on www.cgvertx.com/videos/training/C3DUVUnwrapping/C3DUVUnwrapping.mov

Let me know what you think. I know it's not ready as a proper tutorial. I feel I've gotten the concept, but not completely. It may help you, nonetheless.
 
Use select and transform tools in the UV pane

The scatter of shapes on the UV texture seems typical. You can select a shape (area select) and then use transform to rotate and relocate it. Do that before you save the UV as a PDF (then convert to tiff, take into Photoshop, etc.) or start painting with the built-in tools.

The $29 beginners video tutorials are actually very useful on this, if not complete. There is an art to defining your seams. The tutorials still reflect version 4 though and you will need this video to understand the new Node Editor, and to manage UV materials.

http://loewald.com/loewald_public_webdav/really_quick_intro_to_nodes.mov

Also see this summary I compiled from podperson's node guide

http://www.gomaya.com/glyph/docs/Node_Editor_Notes.pdf

which came from this thread

http://cheetah3d.de/forum/showthread.php?t=4706

Good Luck!
 
Thanks very much for taking the time to get back to me but I have abandoned it.

SketchUp has it faults, lots actually, but it's easier than this and you can build models to correct scale.

Thanks again.
 
Back
Top