Adding material to back side of polygon face

Adding material to back side of polygon face

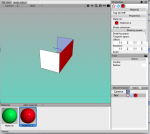
I want to add a green material to the backside of the red surface on this box.

How do i do that?

I have a fairly complicated model of a boat, whose outside hull has material, but the inside has nothing. So I was experimenting here to figure out how to add material to inside.

Any suggestions thanks.
 

Attachments

  • Screen Shot 2017-03-21 at 9.05.33 AM.png
    Screen Shot 2017-03-21 at 9.05.33 AM.png
    104.4 KB · Views: 515
Cheetah3d don´t support double sided polygons - you have either to copy&paste&&flip normal&move this polygon/s or thicken the mesh with the shell tool.

Cheers
Frank
 
... model of a boat, whose outside hull has material, but the inside has nothing.

That sounds strange.
Where does the outside material come from, did you assign it yourself?

It would be helpful to see a screenshot of the model.

In Cheetah a POLYGON has always the same material on both sides.
In the 3D view however only the front gets shaded, the backside remains dark
(as long as you don't activate "light both sides" in the view menu).

In rendering you can use a directional node material utilizing the different normal directions of each polygon to have different materials on each side, but that would get very tedious on a complicated model.

screenshot.png

image.jpg
 
That sounds strange.
Where does the outside material come from, did you assign it yourself?

It would be helpful to see a screenshot of the model.

In Cheetah a POLYGON has always the same material on both sides.
In the 3D view however only the front gets shaded, the backside remains dark
(as long as you don't activate "light both sides" in the view menu).

In rendering you can use a directional node material utilizing the different normal directions of each polygon to have different materials on each side, but that would get very tedious on a complicated model.

View attachment 30642

View attachment 30641

Neat solution! How do you get the hard line break in your gradient? I know there are parameters if you control click the color boxes, but I can't figure out which one you used? Step seems to fill the whole gradient box with one color. Thanks!
 

Attachments

  • steppedGradient.png
    steppedGradient.png
    9.2 KB · Views: 435
Hi Swizl,

You're almost there :smile:
The "step" mode fills color to the right next marker, so when there are only two as in the default gradient, everything will be of one color.

Just add one in the middle though or move the right one to the left ind you'll see.

If there is one on the right end of the scale it will be of no effect.
 
It's funny what you do, really, and stuff like this is usefull elsewhere (like the paperboat, btw., especially as it seems to be modelled just to explain something to someone). Nice people here :smile:

But in reality there is always a thickness to any thing that we can touch (there are physical things I'm really not so sure about). So it's usually not wrong to thicken a mesh (like Frank already mentioned). It can be very, very thin. It's the easiest way. And for beginners the easiest one is usually the best :smile: (and to be honest, I usually stick to that myself).

I write this because I remember well when I was new to modeling and it was important to learn just a few basic facts about 3d (like use quads whenever possible, model in real measurements, polygons and most people have a dark side etc. etc.). It's great what you show, but the best way for the op to learn his way in 3d seems to me not to use such clever but complicated tricks at the start :wink:
 
Thanks Frank & Misover, very interesting methods.

Is there a way to add more than one color box selector in the gradient like you can in Illustrator? I tried to figure a way to do it, but was unsuccessful.
 
Another example of two different images (label front and back side) assigned to the same polygons.

screenshot.png
 

Attachments

  • label.mov.zip
    317.7 KB · Views: 354
Last edited:
Here´s an easier set-up without the "square root"-node because it lowers the contrast of the image and a "step"-node instead of the gradient because it´s easier to adjust the value when the image will flip by setting "edge" to 0,5:
DoubleSidedPolygon.gif
DoubleSidedPolygons.jpg

Cheers
Frank
 
Last edited:
... a "step"-node instead of the gradient because it´s easier to adjust the value when the image will flip by setting "edge" to 0,5

Good point!

... without the "square root"-node because it lowers the contrast of the image ...

Yes, the square root is not essential, only after the label backside appeared to dark in the first renderings lazy me plugged it in instead of editing the image.

A power function can be used to adjust brightness/contrast of images in the node system more easily than using RGB2HSV conversion.

Sadly the adjustable filter value of the image node from previous versions is gone in v7, with that the blurred backside version of the label could have been done entirely within the node system without a second image needed.
 
Back
Top