Begginer quick question... transparency
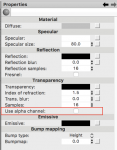
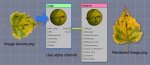
Does Cheetah 3D support the transparency of a .png or .psd file at all when applying a texture to an object? The only way I have seen in the forums is multiplying the texture -- but I don't want that -- I want to overlay a texture on top of another texture with the alpha channel "knocking out" the texture below. Multiplying just makes it too dark and flat. I need to clarify this before moving on. Thanks in advance. BTW, I love everything I'm learning.
-Papoames