Realistic Planet Earth Part 2: Setup and Rendering
Continued from previous post . . .

Setup
The light source is a Distant light rotated to a vertical position and set to an intensity of 1.5. Since a Distant light is assumed to be located at an infinite distance, its actual placement doesn't matter. I moved it a few units above the sphere for convenience.
The three spheres are placed in an earthAxis group so they may all be rotated together. This group in turn is placed in another group, earthTilt, that tips the axis 23.4 degrees.
The earthTilt group shouldn't be rotated, but it can be used to change or animate the position of the earth. The heading or Y (green) axis of the earthAxis group can be rotated to change the rotation of all three spheres, or each sphere can be rotated individually to adjust the relative positions of the surface and the clouds.
The earthClouds material is assigned to the clouds sphere; the earthAtmosphere material to the atmosphere sphere; and the earthSurface, earthLights, and holdBack material are all assigned to the earth sphere.

Rendering
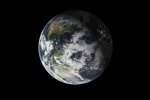
There doesn't seem to be a good way to combine the earthLights and earthSurface materials so everything can be rendered in one go. So this approach creates three renderings (or render passes) that can be combined in Photoshop or After Effects.

Base: Enable "Visible in renderer" for earth, clouds, and atmosphere. Make sure the "Tag On/Off" setting is ticked for the earthSurface material, and not ticked for cityLights and holdBack materials. Render and save.
City Lights: Disable "Visible in renderer" for the clouds and atmosphere objects. Untick "Tag On/Off" for the earthSurface material, and tick it on for the cityLights material. Render and save.
Holdback: Same as above, except untick "Tag On/Off" for cityLights, and tick it on for the holdBack material. Render and save.

Use your favorite image editing application to combine the Base and Lights renderings into a single image. Invert the Holdback rendering and apply it as an alpha mask to the city lights.
Done! Happy New Year.
Sample video, created from four render passes (surface, city lights, clouds, and matte) and composited in After Effects: https://vimeo.com/157920878.
Files: View attachment earth.zip
Continued from previous post . . .

Setup
The light source is a Distant light rotated to a vertical position and set to an intensity of 1.5. Since a Distant light is assumed to be located at an infinite distance, its actual placement doesn't matter. I moved it a few units above the sphere for convenience.
The three spheres are placed in an earthAxis group so they may all be rotated together. This group in turn is placed in another group, earthTilt, that tips the axis 23.4 degrees.
The earthTilt group shouldn't be rotated, but it can be used to change or animate the position of the earth. The heading or Y (green) axis of the earthAxis group can be rotated to change the rotation of all three spheres, or each sphere can be rotated individually to adjust the relative positions of the surface and the clouds.
The earthClouds material is assigned to the clouds sphere; the earthAtmosphere material to the atmosphere sphere; and the earthSurface, earthLights, and holdBack material are all assigned to the earth sphere.

Rendering
There doesn't seem to be a good way to combine the earthLights and earthSurface materials so everything can be rendered in one go. So this approach creates three renderings (or render passes) that can be combined in Photoshop or After Effects.
Base: Enable "Visible in renderer" for earth, clouds, and atmosphere. Make sure the "Tag On/Off" setting is ticked for the earthSurface material, and not ticked for cityLights and holdBack materials. Render and save.
City Lights: Disable "Visible in renderer" for the clouds and atmosphere objects. Untick "Tag On/Off" for the earthSurface material, and tick it on for the cityLights material. Render and save.
Holdback: Same as above, except untick "Tag On/Off" for cityLights, and tick it on for the holdBack material. Render and save.

Use your favorite image editing application to combine the Base and Lights renderings into a single image. Invert the Holdback rendering and apply it as an alpha mask to the city lights.
Done! Happy New Year.
Sample video, created from four render passes (surface, city lights, clouds, and matte) and composited in After Effects: https://vimeo.com/157920878.
Files: View attachment earth.zip
Last edited:

