IES Lighting Help request

IES Lighting Help request

:( :confused:
I have been trying to understand IES Lights. I’m completely lost.
I've watched some tutorials for other 3D Apps but I still don’t know where to begin in C3D.
I don’t even know what questions to ask.

Seems there are some special images one needs. Then there is some special reader one needs.

1 Is that correct?

2 Are all images compatible with Mac as well as PC’s

3 To start out it would be nice to obtain free images.

4 Is there a good place to find these images.

5 It would be really nice if someone could put a tut together.

I realize that is a lot to ask.

Thanks just in case.

My Best
Jeanny
 
Hi Jeanny!

IES-lights work since version 7.2, with point, spot and area lights.
You should do a Google image search for "free IES lights", there you will see many tables containing examples of the light shapes.
Then you download one of those packages, f.i. this one and store the folder somewhere on your disk where you keep your textures, HDRIs and such.

An IES light is basically a spot light with some fancy light cone :smile:
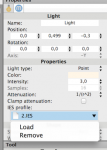
When you have a light (point, spot or area) in your scene you can activate IES in the light properties by attaching an IES file like you would attach an image to a material or a mesh to a particle system:

screenshot.png

IES lights work best when located close to a wall where the pattern will appear, a lamp in the middle of a big room would be rather pointless.
You need to experiment with those different files which is a bit tedious because when loading it in the light properties nothing shows up so you get no feedback until you render it.

You don't need a special reader to make them work in Cheetah3D (it would be helpful only if you downloaded a vast amount of files with no image table overview).

Sometimes the IES profile is darkening the light substantially and you need to increase the intensity.

Here's an example file for you:
 

Attachments

  • cornell.jas.zip
    27 KB · Views: 275
Last edited:
:D Thank you SO-OO-OOO-O MUCH!
Your explanation was just excellent.
It cleared out all the question marks that were banging around and causing quite a commotion in my brain.
Whew - now my headache went away.

Thank you for not only including a link to a place where I could get some good IES lights
but also your jas file in which I could get a good overview of what was going on.

My Best
Jeanny
 
Thanks to Miso's tut I was able to accomplish using IES Lights.

Now I'm wondering if some of the IES lights can be altered somehow to make something like:

Star Rays
God Rays
Sun Rays
Angel Rays
Sun Rays shining through tree leaves

I gave it a try. My feeble attempt leaves me drawing a blank.
I tried using just a plane by itself in the background to reflect the lights -
then adding a Render Tag to the plane and leaving Visible in camera unchecked.

I haven't found any lights that would make the right shape.
Is it possible to make an IES lights in C3D.
Seems it would be so much easier if the IES light images could be altered in some way?

If it is possible could someone please set me in the right direction?

Thanks

My Best
Jeanny
 
Hi Jeanny!

God rays or sun beams are atmospheric phenomena which would need volumetric rendering in Falcon.
I think Martin is already working on it but it's not there yet.

After googling a bit I found one IES creator with a Mac version here but no freeware.
There are free apps for Windows around that could be used if you have set up a Windows partition via Bootcamp or else.

Faking light beams in Falcon I couldn't achieve yet :redface:
 
Couldn't have IES lights explained half as good as Mis did.

Just a few things to add:

They are used usually for interior architecture renderings. Mostly IES lights are created by the light manufacturers to get the real shape of an existing lamp. So they are quiet important for this field of 3d, not so much for the rest.

They can be used on the ceiling too (you get the shape on the floor). But as Mis said, best use is for certain light sources on the wall.

Often saw renderings with them used as kind of decor lighting. And they somehow destroyed otherwise good renders because it just looks unrealistic have such things on the walls without a believable light source near it.

I remember having found years ago some fancy forms for ies lights, but couldn't find it anymore today. But they seem to be around (only, to be honest, I don't really see a use for it in photorealistic renderings).

As Mis already explained sun rays and stuff would be volumetric lighting. And Martin is working on them, but thanks to apple and their decision to ... (can't find the right word .. decre...) ... to let go of OpenGL it will take a little bit longer. At the moment everything where you see the light itself in the air (like god rays) is not possible.

To get fancy shadows like said tree leaves or sunblinds is easy. You can load a texture into spot lights.

Or you could create a 'gobo' with a poly and a texture of said shadow pic on it, like part of a tree, where the tree is black, the rest transparent. You could find such pics in the net. If you have the light source behind that poly you then have the shadows on walls, floors, motives etc. So you can use area lights or (tricky to position sometimes) even hdri. The poly is always outside of view in the render.

(Gobos are used in photography and are in reality essentially the same, some plane made from plastic, metal or so with holes in it, you position between light source and subject. If you see a professional photo of someone with the shadows of a sunblind it's probably done this way).
 
To get fancy shadows like said tree leaves or sunblinds is easy. You can load a texture into spot lights.
Not getting this to work.
 

Attachments

  • GelTestForum.jpg
    GelTestForum.jpg
    192.8 KB · Views: 318
  • GelTest.jas.zip
    9.2 KB · Views: 280
  • GelTest.tiff.zip
    8.5 KB · Views: 253
:smile:
Thanks so much for your replies.

@ Miso
God rays or sun beams are atmospheric phenomena which would need volumetric rendering in Falcon.
I think Martin is already working on it but it's not there yet.
I was just hoping a fake volumetric light could be achieved.
I realize and appreciate that Martin has been working on them for us.
I’ll just have to patiently wait.
After googling a bit I found one IES creator with a Mac version here but no freeware.
Thanks for the link to the web site for IES lights. I have googled IES lights and there certainly are many sites that offer them. The site you linked to is indeed an exceptionally nice site for IES lights.
@ Hasdrubal:
To get fancy shadows like said tree leaves or sunblinds is easy. You can load a texture into spot lights.

Or you could create a 'gobo' with a poly and a texture of said shadow pic on it, like part of a tree, where the tree is black, the rest transparent. You could find such pics in the net. If you have the light source behind that poly you then have the shadows on walls, floors, motives etc. So you can use area lights or (tricky to position sometimes) even hdri. The poly is always outside of view in the render.

(Gobos are used in photography and are in reality essentially the same, some plane made from plastic, metal or so with holes in it, you position between light source and subject. If you see a professional photo of someone with the shadows of a sunblind it's probably done this way).
I’m lost as to exactly how to achieve that.
I take it that is what Unc808 was trying to do with his post.
I tried to use Unc808’s file but this is all I could achieve (please see attachment)
The colors don’t show as vivid as they actually are unless I uncheck Ambient occlusion but than the background is black.

@ Unc808:
Thanks for posting your question Unc808.
@ Frank
Thanks for your reply Frank.
That effect is so cool!

I altered Unc808's file and attached it
I attached the Png that I used for an Image
I also attached a png of my results

Could someone help me?

My Best
Jeanny
 

Attachments

  • Gel Test Image.jas.zip
    9.7 KB · Views: 251
  • Butterflies Sm.png
    Butterflies Sm.png
    75.6 KB · Views: 299
  • Gel Test Image.png
    Gel Test Image.png
    66.6 KB · Views: 291
Last edited:
Not 100% sure what you´re after but you can skip radiosity, get a second weak light source to illuminate the scene instead and increase the intensity of the gel lights as use more vivid colours in your light texture. Or use pure white for the texture and adjust the color+intensity at the light source: at the overlapping colours will appear lighter though: As you can see in my former image as a proof of concept: R+G+B=white. :D

Cheers
Frank
GelLightRendering.jpeg
RGBlights.jpeg
 
Last edited:
You don't get as vivid colors because you project light through a filter, like in reality as if you would put a colored glass before a spot. The picture on the wall wouldn't be as intense as the glass. Everything else wouldn't be very convincing in a render. So try not to get too vivid colors :smile: And if they are too sharp they also don't look projected.

For an image it's always important what the viewer thinks. He has somehow to understand how those butterflies are created in the picture or he will think it's just a cheap and unneccessary photoshop effect. That's why in my opinion stuff like this works best with shadows. This the people understand.
 
@ Frank:
Thanks! Your Render is even better than what I was originally after.
I just like the effect of light shining through a colored glass.
I guess I was thinking I could us it as background in a project.
I am trying to duplicate your results but can’t get it.

May I ask what second light source you used and where to place it in in the scene?
I so have a time of trying to make the lights work well for me. It certainly isn’t because I don’t try.
I just can’t seem to put it all together correctly.

I'm also wondering why I am getting a type of halo effect around the box?

I’ve attached one of my many trials that I rendered in Falcon.
I decided too take the shadow off of the box by using a render tag.
I believe my Light Source should look like it is all coming from the upper left corner
but when I place it over there is completely washes out the green butterfly on top of the box.

I like the color of your butterflies they almost look a bit emissive (they are a whiteish green and blue).
Could you tell me how you did that - please?

Thanks for including the Color test. That information will be handy to keep in mind in a lot of projects.

@ Hasdrubal
Thanks for the tips Hasdrubal. Good information to keep in mind when going for a natural realistic effect.

My Best:smile:
Jeanny
 

Attachments

  • Gel Image Test.jas.zip
    18.2 KB · Views: 232
  • Gel Image Test.png
    Gel Image Test.png
    216.3 KB · Views: 259
  • Butterfly Images.zip
    89.6 KB · Views: 238
Last edited:
Back
Top