Help understanding this UV layout?

Help understanding this UV layout?

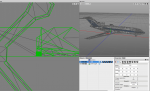
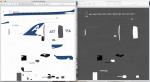
I downloaded this airplane model from the internet (see below link) but do not understand how the author is able to texture it. It seems like the texture maps have very specific areas that map to a uv layout but when I open up the UV editor in Cheetah it is a complete mish-mash!

http://www.cadnav.com/3d-models/model-43601.html
 

Attachments

  • Screen Shot 2018-03-13 at 11.16.25 AM.png
    Screen Shot 2018-03-13 at 11.16.25 AM.png
    249.2 KB · Views: 324
  • Screen Shot 2018-03-13 at 11.17.10 AM.png
    Screen Shot 2018-03-13 at 11.17.10 AM.png
    329.8 KB · Views: 341
  • Screen Shot 2018-03-13 at 11.17.53 AM.png
    Screen Shot 2018-03-13 at 11.17.53 AM.png
    445.2 KB · Views: 334
Hi,

As nobody answered who knows better than me ... I'm not quiet sure, but it could have to do with UDIM (multi-tiled UV-Maps that obj can't handle). Or the person who textured this created several uvs for the same object (some 3d apps can handle an (almost) unlimited amount of them).

What's certain: He or she textured each part of this individually without creating ever a big, clean uv-map for the whole model with seams and all. Instead several maps (or tiles) where created where at least the part (s)he was texturing was clean without any disturbances. As it looks most polys where mapped several times (they just were of no interest sometimes). Some overlapping parts where created willfully so an image can be seen on both sides of the model (like the a-logo).

Anyway, tiles or lots of maps, this can't be exported into obj. So the exporter creates a big mish-mash in one UV-Tile. Which somehow worked (that's the most asonishing part).

There are other possible reasons for this I can think of, like some problem with uv space, but there is no way to clean up this mess, not even in the program it was created.
 
What a mess. Why not remodel it yourself and then UV map it. You would learn and also have a better simpler un-messy model plenty of plane tutorials in the ether.:smile:
 
This is easy to replicate by "merging" UV mapped objects together.
You can still zap through the assignments by selecting first the object and go through the "Polygon selections" - if you have to. ;)

Cheers
Frank
 
For my minimal needs in bringing this over to an Element 3D project I was able to use it without having to re-do any texturing. I needed to delete the wheels and close the flaps as I wanted to show this in flight and luckily those modifications didn't disrupt the texturing.

Frank can you explain your suggestion about merging the UV maps together? I do not understand what or how to do that.
 
Frank can you explain your suggestion about merging the UV maps together? I do not understand what or how to do that.
The maps won´t be merged (unless you´re baking the merged object) - the objects will and maintain the polygon selection with its own materials:

1. first object
2. second object
3. merged
4. Newly baked texture of merged objects

Cheers
Frank
 

Attachments

  • first.jpg
    first.jpg
    89.9 KB · Views: 257
  • second.jpg
    second.jpg
    95.2 KB · Views: 255
  • Merge.jpg
    Merge.jpg
    118 KB · Views: 260
  • Baked.jpg
    Baked.jpg
    101.6 KB · Views: 264
Last edited:
Back
Top