Symmetrical Material

Symmetrical Material

Symmetry is a fundamental design element, evident in the Parametric, Creator, Modifier, and Spline objects. And it’s easy to flip a normal.

Is it possible to use a node, mathematical or otherwise, to reverse the pattern of a material? In the attached picture, I flipped the right plane in Photoshop, to depict what I want to do with a procedural material (not an Image node) in the C3D Materials system.

It seems simple and basic, but is it? If it’s not possible, could a Javascript work? Thanks.
 

Attachments

  • symmetrical_mat.jpg
    symmetrical_mat.jpg
    47.8 KB · Views: 468
Last edited:
Hi Joel,

do you want a solution for a 3D-material like Voronoi, Turbulence etc or for a UV-material?

When you apply an Image via UV mapping you could easily mirror the imige in an editor like you did in the example pic so I assume you're after a 3D solution.

There is a position output in the state node and a position input in the texture nodes.

We need to cancel out the positioning that is normally done (when the default texture position input is 0,0,0) and replace it with the negative in order to reverse the texture.
To do that we multiply the state node position output with -2 in all channels.

For symmetry we need to keep half of the object material unchanged.
The step node at 0,0,0 will set all parts of the surface with negative coordinates to 0 and the positive ones to 1.

Multiplying both will now apply the reversed material only to the positive half.

This can be done with all three axes simultaneously.
In order to restrict the symmetry effect to a certain plane the other axes are set to zero instead of -2 in the first multiply node.

Caution: Some texture nodes like checkerboard, cellnoise and voronoi have a different internal scale of factor 4!
Those need to be multiplied with -8 instead of -2!
Same when the texture scale is not at 1,1,1; then the factor has to be adjusted accordingly (scale 2,2,2 needs factor -4,-4,-4).


sym.gif


Edit: UV-Version:

UVsym2.png
 

Attachments

  • symmat.jas.zip
    13.3 KB · Views: 343
Last edited:
Thanks for the amazing directions. I think these materials are a great finishing touch for many symmetrical models. I was able to extrapolate 3D variations from your attached .jas example, but I cannot duplicate the UV1 result from the second picture.

The picture's 1 1 1 -2 -2 -2 settings do not generate the all black Multiplyadd icon, and so there is no symmetry in the final material. I tried tweaking the six B and t settings, but I lack your mathematical comprehension of the process and trial-and-error didn't help.

Thanks again for the prompt response. I respect your ability to envision the underlying math to "connect the dots."
 

Attachments

  • multiplyadd.jpg
    multiplyadd.jpg
    99.3 KB · Views: 429
  • symmat2.jas.zip
    38.2 KB · Views: 324
Hi Joel,
I'm glad you found this usable.

Regarding the UV variant:
When using the UV1 output from the state node with a procedural texture you need to set the texture from its default 3D setting to UV1 too (node properties: Sample). It's also in my pic in the turbulence properties but easy to overlook, should've highlighted it.

The multiplyadd node in your file looks different because you've set the preview to value instead of vector.

EDIT: I've highlighted the settings in the image of my previous post.
 
Last edited:
You replied in less than an hour; I am in no hurry, just trying things out, but I appreciate your attention to my questions.

I never noticed that it was possible to have a different preview icon than the one for the node in use (Value instead of Vector).

Years ago I had great frustration getting Baking to work because I overlooked the UV1 setting. Frank caught that one.

I still don’t get the all-black Multiplyadd preview; I’m just curious why not, since the function seems to be right — after I switched from 3D to UV1 in the Turbulence node everything worked as expected.

Final question, as long as you’re here: the material set-ups you provided generate symmetrical patterns, which is what I asked for; can you also suggest the simplest node arrangement for flipping the whole pattern, like the two planes in my original post? In other words, two separate materials, left and right mirror images. A Reverse material to match the default Obverse material.

Thanks again.
 

Attachments

  • multiplyadd2.jpg
    multiplyadd2.jpg
    100.3 KB · Views: 434
Hi Joel,

I don't know why your node shows a different pattern, but sometimes the node preview goes weird.
The important thing is that it works now for you.
Here's a screenshot of your file with the UV1 modifications on my computer:

Symmetry 4.png

For a reversed material:
Just cancel the step and the second multiply nodes.
A procedural node has its own positioning (+1).
When you feed the negative position from the state node in, those should neutralize each other (+1-1=0).
When you feed the double negative position in one negative remains (+1-2=-1).
So that's what we need to get from +1 to -1.
The 3D coordinates have the origin at the center and cover a range from the negative to the positive, so that reversing it mirrors it on a center plane.
UV maps are always positive, from 0 to 1.
In order to have the mirror plane in the middle we need to add 1 in order to change a 0>1 transition into a 1>0 transition and not a 0>-1 transition.
That's what the multiplyadd node does.

You have always the options to reverse at one or several axes, those excluded need factor 0 instead of -2.
Here's a screenshot with untouched procedurals vs reversed ones, by one axis:

reverse.png

When you get some nice renders out of this, I'd like to see! :smile:
 
I have tried to duplicate the node arrangements in your last picture and directions but I’m getting different results. I don’t understand your written explanations and my trial-and-error attempts have proven futile.

I’m still unsure about the Multiplyadd node Preview icon looking different, because I believe I have the same settings as you, but different results. I assume, as before, I have missed something. The Texture node Preview icons do not resemble your mirror image materials, and they are split in half.

EDIT: Comparing my result in post #5 with yours in #6, the material is visibly different. Assuming you didn't change anything, why aren't they identical?

I am attaching the C3D test file — if you don’t mind, please check the last two materials — UV1 and 3D — and correct the settings and attach the updated file to your response. That would be the best way for me to see my mistakes and learn how to do this. I’d like to see exactly where I made mistakes. The math nodes are not intuitive for me. Sometimes attaching a file is the simplest way to make a point.

I use versions 7.1, 7.2, and 7.3b3 on two Macs, but I don’t expect that’s a factor.

Thanks for your patience.
 

Attachments

  • multiply3.jpg
    multiply3.jpg
    133.3 KB · Views: 447
  • Multiplyadd3.jpg
    Multiplyadd3.jpg
    136.7 KB · Views: 454
  • symmat3.jas.zip
    49.3 KB · Views: 322
Last edited:
Joel, I'm sorry for causing confusion. :redface:
I promise I'll stick with you until we got that sorted out!

There may be a bug involved with the half-split preview of the multiply node in your version (#5) vs mine (#6).
This is complicating things and I don't know the reason but I don't think it's your fault when the same file looks differently on our screens.
Let's put that aside for a moment (maybe we need to ask others to look and post screenshots) and continue with your last file.

The good news:
The UV material in my node editor looks exactly like your screenshot!

Now for the correction:
That's probably my fault because I didn't attach a file and also didn't explain this point:
You used the -2 factor in all three channels. That means the material is flipped three times in all three dimensions. This includes the z-dimension which is front vs back on the small preview ball in the nodes.
That makes it impossible to compare two turbulences side by side.
To do that you need to stick to the x (left-right) and/or y(up-down) axes.
I corrected the multiply node in the 3D material to -2,0,0 and now you can see how both nodes show mirrored previews (maybe you try 0,-2,0; 0,0,-2; -2,-2,0 and other combinations to make yourself familiar what axis has which effect on the preview).

Then you introduced a second row with a voronoi texture. Unfortunately this texture doesn't stick to the objects scale factor but has its own.
For this you need an extra multiply node with the factors -8,0,0; I put that in the new file.

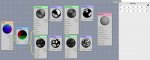
Now for the UV material. This is how it looks on my screen right after I open your symmat3.jas file from post #7, below the corrected version from symmat4.jas file attached in this post:

sym3UV.png
Sym4UV.png

What did I change?
The turbulence node has scale values of 8,8,8; that needs to be multiplied with the values in the multiplyadd node.
So instead of 0,0,0/1,0,0/-2,0,0 it must be set to 0,0,0/8,0,0/-16,0,0.

I guess this is all very confusing but hopefully checking the new file will help you to get familiar with the effects of those many numbers.

Again the second row with the voronois needs their own multiplyadd:
The voronoi texrtures come with scale values 1,1,1 but internally that is (also for checkerboard and cellnoise) 4,4,4 so that needs to be factored in at the multiplyadd to the result of 0,0,0/4,0,0/-8,0,0.

Now back to the UV multiplyadd discrepancy:
Please check if the UV material of the symmat4 file from this post looks like my second screenshot above.
If not, we need to dig further and maybe ask others which display is the true one.

Sorry again for my ramblings but hopefully you'll get something out of this,
see you soon!
 

Attachments

  • symmat4.jas.zip
    49.8 KB · Views: 348
I just opened the file and it looks great — both the UV1 and 3D. The results look different than your screenshot, but they successfully generate reversed materials. I will take some time later to inspect them in detail and fiddle with the settings according to your directions.

I am very grateful for your expertise and willingness to help out on the forum, not just in this instance but since you became an active contributor.

I have been using the forum to exchange information for 11 years and I don’t recall seeing anyone using materials with integrated symmetry (not a flipped Image node). It seems like the most obvious idea, considering that most of the modeling objects have integrated symmetry, not to mention real-life crystals, starfish, and humans.

Symmetrical materials make a lot of my aesthetic ideas possible, and they promise to be useful for most C3D users. I look forward to making some things just to apply them.

I will follow up with a couple of related questions when I have a little more time. I will also add another screenshot and attached .jas file with some symmetrical materials to a recent post in the Tutorials with basic materials for beginners.

https://www.cheetah3d.com/forum/showthread.php?t=13002

Thanks for the detailed explanations and, especially, for the sample file. When I posted my question a couple of days ago I did not know if this was even possible, and now anyone can do it. Well done.
 
I don’t recall seeing anyone using materials with integrated symmetry
Thanks Joel, looking forward to your experiments with symmetric materials.
The reason for this not being done before might be that we're talking procedurals here and those have never been very popular with most users, presumably because:
- they cannot be exported to other apps like image based materials can.
- since Falcon render times are a bigger issue and procedurals slow down rendering considerably.
- and they are more difficult to set up than image maps of course.

Martin is going to introduce material displacement soon I hope and that will make the node system including procedurals much more powerful.​
 
Last edited:
Actually I don't fully agree, mis. Procedurals may take a thad longer to render, bat that's usually not that important. They can be baked and exported.

As you say they are more complicated to set up. In my opinion it's quiet difficult to get a real convincing result just with this procedurals available in Cheetah. It's not bad, but one of the weaker functions here.

The best approach in may opinion, probably in every app, is to mix real images and procedurals to get some irregularities into the material.

About Joel's question: I can't remember ever having the need for integrated symmetry in a material (and I created some strange stuff years ago). What I want is ways to disturb the pattern from repeated image maps and I usually combine several maps (images and prozedurals) into a material.

I would try to use 2 materials and somehow to flip the material in there (for example with flipped images).

Nodal systems can be great, but all in all, I have to admit I do still prefer the old layer approach with abilities to stack and mix pictures and materials on each other, blending them, using parts as masks and whatever. It can be done with nodals, but it's always more complex then, say, load a picture, load a prozedural, multiply, opacity 30 %, load another picture, multiply, opacity another 30 % and so on, this for every channel you like etc.

In my opinion the complexity of the node system is another reason why prozedurals aren't that widely used. It's actually easier to do what you want in a paint app and then load the finished pic(s) for diff, reflection, bump and so on (but if you want to create irregularities in a map, it's more memory-heavy this way).
 
Procedurals may take a thad longer to render, bat that's usually not that important.

mattest.gif

Here's some test I made a while ago.
The procedural concrete material in there is not finished because after I encountered the extra time it took to render I gave up on it.
While an image material with just one pic (but used in three channels) was 1.25 times than a no texture material, the procedural takes four times.
There is a turbulence node in there with default settings of 8/2/2.
Eight octaves means eight layers of differently scaled turbulence patterns mixed.
Thats quite a lot of floating point math to do at every ray bounce (using 4/3/1 with higher scaling takes still 500 seconds).

Since then I try to use only a single noise node :smile:

Making a convincing procedural concrete material ready for close up shots would require at least one, probably two more fractal nodes bringing the render to a crawl.
Of course it could be baked in, but given that there is no shortage of free concrete textures on the web why take the effort?

Your approach of mixing and layering (with fast/low octave fractals) is a good one.

Maybe some time in the future we'll have GPU rendering and denoising and maybe affordable octo-cores and then I'll go back to procedural texturing with fractals, if I'll live to see it :rolleyes:

@Joel: sorry for off-topic!
 
Last edited:
Judging from the posts to the C3D forum, there are two broad categories of users, professionals and hobbyists. The Pros have deeper knowledge of C3D, and they also use other 3D software. For myself, Cheetah is my sole 3D app, it’s just right, simple and powerful, and fun to work with.

Being familiar with Photoshop, image-based materials are more intuitive, but the procedural materials are more interesting to try to figure out and experiment with. I started with C3D Version 4 because it was a cheap way to render with radiosity. When the improved procedural node materials system was added in Version 5, it was like going from caffeine to LSD.

Slow render times, and creative productivity, depend on your frame of reference. Some of you have pressing deadlines and huge animation files; you compare how many seconds your 2018 Mac takes to how many seconds your 2016 Mac took. A hobbyist might compare how many beautiful 3D renders he makes today with how many he made 10 years ago. ZERO.

Today I was able to make some fantastic 6-spoke radial symmetrical materials by connecting a Multiplyadd, Turbulence, and Gradient node. Two materials, identical except for the connection between the Multiplyadd and Turbulence node. What distinguishes this procedural approach is that everything was done in C3D, and it was infinitely tweakable to get a harmonious balance of colors, proportions, and the granular detail of the texture. Thanks to Misoversaturated, I now have a new range of artistic possibilities — he made the tool to match my imagination.

Martin has achieved the right balance of pro-grade powerful features and ease of use. The final essential ingredient is the forum and the interaction it affords between all levels of users.
 
Last edited:
@Mis

I fully agree with you, but I know that a good result needs time in 3d.

That said, I often spend some time to get exploding render times down. When my test render takes hours, at a quarter of the desired resolution, I stop it, because I know for a fact that in the end I will have at least 16x that time. The easiest way would be a supercomputer but actually that's a bit on the expensive side.

And I never would try anymore to create something like your concrete material solely with procedurals. Not because of the time, but because of the realism. It would look phony.

For a close range pic, a pbr would probably be the easiest solution, without further fuss (and I hear you moaning 'render times!, but I will come to that). But for middle or long range one will see the pattern. I have to combine it with something else to break that pattern. And this usually means mixing several textures (photos and / or procedural) until the pattern is not that visible anymore (or change the texture to something where the repetitions don't hurt that much. But even a tiles pattern has to be broken up somehow).

So I end up with some complicated materials that are heavy to render (on meshes that sometimes are a little on the heavy side in the polygon-count). If I want a halfway believable result, I simple have no other way to go.

So my answer is just: planing. I can render while having lunch or dinner. Or while I catch up on the accounting on another PC. Or proof-read some stuff. I can render all night through or sometimes on a weekend (sometimes I use whole sundays to catch up on rendering). The important thing is, I think I mentioned it before, rendering does not eat my time. I can work on something else, do it in my spare time, whatever. If I need the computer for other work, it simply has to wait (I remember, a long time ago, when I had to explain to a customer that I couldn't look up his data because I had a render cooking. She hadn't much understanding for that, because of course she was more important than any other customer in her own view. So I try to avoid really long renders on work days, but up to half an hour, no problem). And I always do smaller renders first (usually at a quarter of the desired resolution, sometimes an eight (then the real time will equal to 64x at least)).

So, creating a really good texture in photoshop can eat some of my time, while procedurals or so eat the computers time, not mine. I just have to start and sometime later to save. Being self-employed it's anyway normal for me to work on weekends, in the night or whenever. So I try to go whatever way I myself can be faster, even if that means the computer will take longer (I wish there was a way to do that with accounting, too, or such other boring stuff).

@Joel

You're right about the frame of reference, deadlines and stuff. But today I try to avoid deadlines that involve me working for 20 hours a day, no matter how well it is payed. Because one day it will catch up with you (and by the way, if you sleep just a few hours in 7 days, that's really a little like being on LSD (only with that drug you shouldn't have black-outs)). And it did catch up with me, I probably couldn't do it anymore if I wanted. After several years of enough time to sleep, my sleep rhythm isn't really normalized and I have bouts of insomnia while being tired as a Grizzly at winter begin. It's not worth it.

I always keep my word to a customer, but I estimate the time I will need for something quiet generously. (Probably learned that one from star trek, too, when I was a child, Scotty and his wonders).
 
Interesting to hear how different strategies allow users to find a working balance between the conflicting demands of their creativity and their equipment.

Being a hobbyist with no deadlines I still have to reach that point.
I'm more interested in the effects of natural lighting than in modeled things or textures and so there is always a strong dependency on the hardware and software side of things.
Formerly being comfortably immersed in the Apple universe I get increasingly fed up with their attitude towards their customers, developers, asian workers and those govenrments whom they refuse to pay taxes. Yet other manufacturers or Microsoft are no better in any way.

70% of my ideas I can render with Cycles or LuxRender but somehow once Blender gets involved the fun goes away.
Cheetah with Falcon instead is a joy to use but 80% of my ideas cannot be realized because of missing features or specs.
So I'm constantly oscillating and in a permanent state of frustration and confusion that after some time forces a break to get some distance.

Today I was able to make some fantastic 6-spoke radial symmetrical materials

A couple of years ago I made a procedural snowflake material (the symmetry done by UV mapping IIRC) and than didn't save the material so only a render pic remains:

snowflakes.jpg
 
Sorry, when I derail more from the topic, but ...

@Mis

For hobbyists I'd usually say, there's nothing better than Cheetah (as long as they have a Mac). It's easy and pure fun to work with (mostly). It can't meet every need, though.

In your case, I'd recommend something else, to be honest. Model away with Cheetah and get a standalone renderer. You would be happy as a hog with Maxwell Render, which is the only renderer out there that is all about light (almost everything good in Cycles they tried to rebuild from there; and they have a standalone variant, not only plugins). It's not very expensive.

For years Maxwell was the best renderer out there. I'm not so sure anymore about that, but for you it would probably be the best solution. On the downside: No GPU-rendering for MAC, because that works only with the nvidia cards at the moment. And it's not that expensive. The only thing I don't know about is the stability. But you should take a look.

Luxrender dito. They tried to get the same results as Maxwell (they are not even in the same ball park).

About Apple: Lately they got a lot of flak from everywhere, but as you said, the others are no better. Last week apple paid up 12 billion (which the Irish government doesn't want. They are afraid that all the big companies there, MS one of them, are going away and with them the jobs). So it's parked for the moment. Of course they only do it because they have no other way, not because somewhere there suddenly got a social conscience. But from now on they will at least behave a little better till they found a new way. The others will shovel away what they can ... And so on.

But I switched from Windows with a reason: Their new business plan involves selling my data. Google wants to sell my data. Apple doesn't (again, they are no better than the others but understand that there are people who don't like that and go to or stay with apple just because of that).

And the OS is pure heaven in comparison. I always had expensive hardware but still lots and lots of trouble. Windows 7 was great, yeah, but with updates you need (because of the security risks) they really took the fun out of it (I sometimes had days where I just had to repair stuff for half a day instead of doing my work. Or something that made fun. Or ideally both at the same time).

Linux would be the answer, but there is too much software I would need. And the social problems about workers ... It's the hardware that does the damage (environmental also). I couldn't make a living without computers so I have to swallow that (while boycotting firms that aren't as bad as this industry because I can).

I hope that Apple gets better and will try to connect to their customers again (I don't see that to optimistically).

Back to topic:

I like the abstract snowflakes. Could use some better lighting, though ...
 
Steve Jobs had firmly decided more than 15 years ago that Apple was going to be the new Sony, and assuming that they are going to stick to this, I see little hope for Apple supporting Pro users in the future.

Maxwell Render is a truly beautiful renderer, but you can also get great results from Indigo Render and Octane Render. Thea Render is also pretty good IMO.
 
THere's a much simpler approach that requires setting the UVW scale in the texture node(s) to 0.001 (you can't set it to zero for some reason). So you just use the Abs node on one coordinate, scale UVW to zero (to counteract C3D's default UVW "creep") and you're done. This eliminates the needs for all the node doubling.
 

Attachments

  • Screen Shot 2018-09-23 at 9.38.22 PM.png
    Screen Shot 2018-09-23 at 9.38.22 PM.png
    266.8 KB · Views: 406
Thanks Pod for pointing out the simplest node solution!

It works great for 3D-procedurals, and when adjustment of the scale is necessary an additional multiply node will do (because we have the scale in the procedural set to zero).

But for a UVW-procedural it works differently, in Cheetah the UV coordinates run from 0 to 1 and are never negative which leaves the ABS-node nothing to affect.

Better to use a multiplyadd node here with B=0.5 and t=-1 for the channel with symmetry. And it avoids the vec2float2vec noodling.

3Dnodes.png

UVnodes.png

And Frank has just pointed out another method to flip UV textures: In the material tag the scale can be set to -1 (that's not possible in the node editor).
 

Attachments

  • Podsymmat.jas.zip
    14.3 KB · Views: 319
Last edited:
Back
Top