How to create a sponge like asteroid ?

How to create a sponge like asteroid ?

Hello, I'm new to all this, and sorry for my wrong English.

I want to create an asteroid with holes and tunnels, like a sponge or a swiss cheese. The surface must be smooth, without any hard edges anywhere. I started with a rough sphere, and I punched many holes in it with some cylinders and the boolean operations. This gave a messy polygonal object with hard edges. Using the Catmull-Clark subdivision, it's was getting worst.

How can you create such a smooth sponge like object with Cheetah3D ?
 
SpongeBob

Hi.
If this is something you expect or can live with; It´s easily done in minutes using one sphere deformed by magnet tool first. Than I used the displacement modifier with an blurred-black-dots-on-white-bump.
(Don´t know how to eliminate the gloosy look of the supermats yet; the one without is velvet.)
kometen_143.jpg

If you need more details, let me hear.

frank
 
Last edited:
What I'm looking for is a rock with tunnels inside. I mean holes and rooms inside the asteroid, not just craters.
 
This is what I was doing. But the borders of the tunels are too hard. They need to be smooth, round.

Someone has an idea ?
 
Hi.

i am not sure what is exactly you want to make, but Boolean Creator make a lot of triangle polygons that causes anexpected edges with Subdiv Modifier.
so, I think, better way is making at first low polygon model of asteroid with tunnels and inner room using polygon tool (inner extrude, bridge, scalpel, etc..), and after making its surface with Displacement Modifier.

tg_jp
 

Attachments

  • asteroidtest_601.jpg
    asteroidtest_601.jpg
    135.1 KB · Views: 1,311
How about this:

c3d_asteroid.jpg


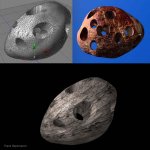
On the left, the mesh inside out with one of the interior spaces selected. The middle one is the unsmoothed rock, and the right one is the same thing with a Subdivision modifier attached.

Here's the Cheetah3D file for closer inspection.

I didn't spend much time making it look rocky, since it's the principle that's most important in this case. You can follow Frank's advice for the visual quality side of things. :)

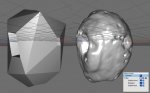
I made it by starting off with a cube (as I do for most things), then subdividing the polygons to get a roughly round shape, and stretching it out a bit. In polygon mode, I selected groups of polygons and extruded them inwards, then used the Normal Scale tool to taper them a bit. This makes some initial craters. You can fiddle with this in all sorts of ways to make it look more organic, but the trick is to avoid having too many polygons... keep it simple, and subdivide it at the last step to smooth it out (don't do that just yet!).

OK, so you've got a rock with craters now. To make the tunnels and interior spaces, you need to extrude some of the craters in even further. Of course, you can't see what you're doing if you try to work on the inside of the rock, so you should use Flip Normal on all the polygons to turn the object inside out, and turn on Backface Culling to hide the outside of the rock. Don't forget, with Backface Culling on, you can only select the side of the polygon that's visible, so turn the model around to look right through the asteroid at the back of the faces you want to work on.

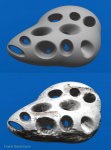
Now just keep extruding the underside of the craters to form tunnels and rooms. As you extrude, you can rotate and scale the leading edge of the tunnel to make it point in a different direction for the next step of the extrusion, and you can just drag stuff around to make tunnels into larger spaces. Again, remember to keep things comparatively simple; you can subdivide it later.

If you want to make your tunnels join together to form a network, you'll need to use the Bridge tool. Delete a face on each of the tunnels you want to join, and use the Bridge tool to link them together. You can also add extra detail to the bridge tunnels by using the Ring Cut tool to add extra segments, then reshaping them.

Once you're done, flip all the normals back the right way around, then apply subdivision to the object.

Hope this helps. Let me know if you need more clarification. :)
 
Hi again.
If this is close, you need metaballs and this is - bad news - not available in Cheetah3d.
bye
frank
 

Attachments

  • kometmetatxtrs_211.jpg
    kometmetatxtrs_211.jpg
    56.6 KB · Views: 1,305
Hi,
the only solution I see at the moment is indeed to make the mesh by and with the polytools. The the boolean tool you will always get quite hard edges.
The perfect tool for creating such stuff are indeed metaballs. They are already on my todo list and I thought about how to implement them.

By,
Martin
 
Thanks a lot to all of you. It helped a lot.

Since I'm new to cheetah3D, I don't know how to smooth a surface, except by using the Catmull-Clark subdivision, which may gives a nasty big mesh if I want the object to be very smooth.
 
Metaballs in Cheetah3d?

I love to hear this, Martin. Cool this.
Look at my first approach to metaballs. Ok you can´t drive this car, but it was fun and simple. Absolut no polygonwork. Just sticking metaballs together.
metacar_201.jpg

frank
 
Last edited:
Hi,
wow these are just metaballs. And I always asked me for what metaballs are good for. Excluding asteroids and liquids of couse. :wink:

Your image is a good motivation for me to add metaballs. :D

By,
Martin
 
Back
Top