About terrain material and assigning color for specific Y levels

About terrain material and assigning color for specific Y levels

Hi,

I'm relatively new to cheetah, and am learning how to create materials through the nodes editor (which seems powerful provided you know your maths ^^).

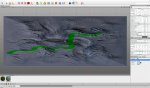
So I'm trying to create a terrain material the same as you can find in this thread : http://www.cheetah3d.de/forum/showthread.php?t=4729

But I'm not able to reproduce this behavior since I can't find a way to specify specific colors on different level in the Y axis...

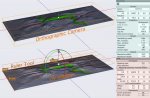
Right now, I've made this :


And it doesn't work at all.

I'm still trying to figure things out, but I thought I could use some help from long timers or people who know. Maybe it will save me time !

Thanks to all who take time to help me out :)
 
Maybe try to start more simple in the beginning:
SimpleTerrainMat.jpg

Cheers
Frank
 
Last edited:
Well, thank you but I already did that ! :/

I was actually trying to get more control over all this: setting less white (with this setup it's impossible it seems), adding texture to the green area for instance, and being able to set particular colors to vertical vectors (ie. special color to cliffs etc...).

The setup from the other thread seemed far more complex, the OP seemed to have great control over his texture.

While not being as complex, I would like to have better control over this, so that I can texture my terrain just with this material, and not having to set UV sectors or the like ...

EDIT : to make myself clearer, a phrase from the other thread catched my attention : "You can also use a bit of math to vary terrain based on slope." This is actually what I would like most of all ^^
 
Last edited:
Well, thank you but I already did that ! :/
Sorry - I didn´t wanted to imply you´re a beginner at all.
While not being as complex, I would like to have better control over this, so that I can texture my terrain just with this material, and not having to set UV sectors or the like ...

Actually UVs of that terrain are just a straight grid and painting a terrain texture is way more easy than trying to do the same with nodes.

Cheers
Frank
 
No no, no offense! Sorry but english is not my native language and I didn't know how to put it ^^

Actually UVs of that terrain are just a straight grid and painting a terrain texture is way more easy than trying to do the same with nodes.

So you say that the UV of a terrain with heightmap is just a straight grid ? I would not need to unwrap and all ?

I'm curious about painting a terrain texture instead of using nodes. How should I do ? Just use a copy of the heightmap and paint on it, then assigning it as a texture ?

Thanks!!
 
..Sorry but english is not my native language and I didn't know how to put it ^^

Same here. ;)

I'm curious about painting a terrain texture instead of using nodes. How should I do ? Just use a copy of the heightmap and paint on it, then assigning it as a texture ?

Thanks!!
Maybe have a look into the UV editor. When no UVs displayed call the "UV Mapper" in flat projection (turn H/X 90°), scale to fit the UV tile and click "OK" at "Write UV coords" - then save it to PDF - open it in your favorite image editor and paint. Or use Cheetah3d´s paint tools.

Cheers
Frank
 

Attachments

  • TerrainUVs.jpg
    TerrainUVs.jpg
    143.2 KB · Views: 498
Thank you very much ! I think that's what I'm gonna do then.

Last question: do you know of any good (I would prefer free too) heightmap editor ?

I'm really struggling to find an heightmap that suits my needs right now, since I need to create a landscape with lake, cliffs, mountains and prairies ... all of that large enough to create a panorama, with mountains in the horizon!
 
Generating 16bit images on a Mac is actually a problem because just Photoshop and PhotoLine do it natively from what I can tell.
I once used to use Bryce´s terrain editor - but the export is ruined by DAZ3d. I now use TerraRay which allows 16bit greyscale image export.
I´m waiting for 16bit support for GIMP - but that maybe take another 10 years. :frown:


Cheers
Frank

PS: not sure. But allows Unity export their highmaps?
 
Well thank you. It's no big deal, i'll figure a way :)

Btw, I tried to export the UV map from my relief, but all I get is a set of lines (see attachment).

I really don't understand what it is related to !! Could you help me on this too, plz?
 

Attachments

  • Prendre une photo 10:10:12 21:37.png
    Prendre une photo 10:10:12 21:37.png
    75.1 KB · Views: 329
Ok, so it's a flat grid now :)

How do I know where to paint things ? How can I know if I paint cliff details on a cliff, lake details on a lake etc... ?
 
Make a rendering with an orthographic camera in top view, choose 1, or 2k resolution. Use the result as Layer one and paint your terrain in layers above.
TerrainLayer.jpg
Render.jpg

Cheers
Frank
 
Last edited:
Well, hope you're still there ^^

I think I did not understand how to setup my orthographic camera.

What I did was to set an ortho cam, then rotate it to have a top view, set it's width and height so that it fits to the relief and then render.

But if I try to use my modified image as a texture, it is all misplaced, with scales not fitting at all.

I tried in "flat" UV mode, which has a really bad output (even when changing scale and rotation, with the best I can do, it's still completely out of shape).

I then tried in "frontal" UV mode, and it's a really better, but still not scaled perfectly. In this mode, one cannot change scale or rotation, so I don't know how to fix this.

Maybe I did something wrong when setting up my ortho cam, but I can't find another way to set it on Top View...

Could you explain me what's wrong with my setup please ? Sorry to bother you again!!
 
Back
Top