transparent window issue?
hi guys, i'm having a bit of a problem with getting windows to be transparent.
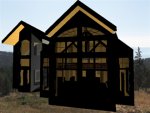
this model is from sketchup, and the window is composed from two layers of a 5% opaque material.
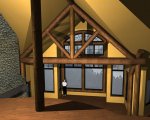
when i import the 3ds file, everything looks great in the openGL page. i can see through the windows from either inside or outside.
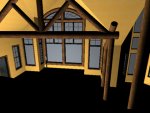
but when i render the windows, they are only transparent from the outside in, and if i add a background .jpg, i can't see it through the windows (from either direction)
i have edited the window materials to 1.00 transparency, as well as adjusting the color opaqueness to 0%.
the only way i can get the image to show through the windows is to erase the glass material entirely, which is not a good solution when i want to render them with a bit of reflectivity, raytracing, etc. etc.
i searched the forums and i can't seem to find a solution anywhere. i also messed around with the alpha channel settings to no avail; though to be honest, i'm not quite sure what that is all about anyway.
i am very much a rendering n00b, so please go easy on me
since i can't enclose the .jas, or .3ds file, i hope i have managed to make my problem clear (or at least clearer than my windows LOL)
cheers, and thanks, chuck
hi guys, i'm having a bit of a problem with getting windows to be transparent.
this model is from sketchup, and the window is composed from two layers of a 5% opaque material.
when i import the 3ds file, everything looks great in the openGL page. i can see through the windows from either inside or outside.
but when i render the windows, they are only transparent from the outside in, and if i add a background .jpg, i can't see it through the windows (from either direction)
i have edited the window materials to 1.00 transparency, as well as adjusting the color opaqueness to 0%.
the only way i can get the image to show through the windows is to erase the glass material entirely, which is not a good solution when i want to render them with a bit of reflectivity, raytracing, etc. etc.
i searched the forums and i can't seem to find a solution anywhere. i also messed around with the alpha channel settings to no avail; though to be honest, i'm not quite sure what that is all about anyway.
i am very much a rendering n00b, so please go easy on me
since i can't enclose the .jas, or .3ds file, i hope i have managed to make my problem clear (or at least clearer than my windows LOL)
cheers, and thanks, chuck