You are using an out of date browser. It may not display this or other websites correctly.
You should upgrade or use an alternative browser.
You should upgrade or use an alternative browser.
Spline Loft Sculpture
- Thread starter ZooHead
- Start date
GS089
Member
Yes, exactly, very interesting! So exited to see the whole sculpture bended like this. Maybe I have thing about the connection between the start and ending. The square/quadrat could be morphed from the small to the big, the distance should be around the same like between the other elements. The other elements (from the last figure) can stop like in the straight sculpture. So cool all you have done!
ZooHead
0
I'll get the other elements in there soon. I don't anticipate any problems with the other elements.
It's been very interesting working with your creation. I'm interested to see it come together.
Are you going to do the notched edge joints or beveled?
I'm not sure what you mean about the morphing the quadrat.
It's been very interesting working with your creation. I'm interested to see it come together.
Are you going to do the notched edge joints or beveled?
I'm not sure what you mean about the morphing the quadrat.
ZooHead
0
Since I'm using a Bend Modifier I can easily bend it further.
There is some editing needed to bend in this direction but it's manageable.
I will show in more detail. To make this work I used the same Boolean
setup as before switched to Addition rather than Subtraction.
So the Quadrat and Bridge are welded together as one object.
That way they bend in unison... for the most part.
ZooHead
0
After taking a slight detour to try out bending, I'm going to refocus on the linear version.
The splines Gerald made and placed so precisely are my
ultimate guide to maintaining proper positioning of all points.
I just checked the Quadrat object and it needed some some slight adjustment.
One thing I would have done differently is to build so the World Center,
the 0x0x0 position, should be around the center point of the object.
Another problem Gerald mentioned was Snapping Points didn't work sometimes.
This can be due to to many other objects around, that get in the way even if they aren't visible.
To avoid that problem I would build each object in a separate file,
so the points of other objects can't confuse the snapper.
Then in another file I can assemble everything.
GS089
Member
The circle version looks great. For the closed loop version there should be another additional element between the little square and the bigger square at the end. So the square could morph from the small to the bigger. But maybe the open loop version is the best one nevertheless... the curved elements would be interesting, I dont know if the curved element is getting a mix between concav/convex and so it will get very hard or even impossible to build.
Helmut
0
* If concavity / convexity is displayed depends on:
1 is there a "soft" spline in the warp?
2 does the parameter for sections UV allow such a geometry?
* In my example there is
* a bent edge in the front cross-sectional spline
* there is a rectangular spline in the middle
* there is a circular spline at the end
* #1 and #3 curvatures are ignored as the sections defined in the warp modifier override it.
GS089
Member
Hi,
i just wanted to colour the missing white elements.. For the element "bridge" select the polygon -> "group select" I could select the individual planes (I even did not had to use your mentioned "split")
But when I want to do the same with element "quadrat" that does not work, I can only select one of the four sides after splitting, but not one of the individual elements, so using the split function is splitting the four sides of the whole quadrat, but does not let me select individual planes... what I am doing wrong?
Are polygons available, or are they part of a creator/ modifier object? In the latter case you need to make it "editable" first to get a polygon-object.
ZooHead
0
To apply a material to one or a group of polygons, just select thoseHi,
i just wanted to colour the missing white elements.. For the element "bridge" select the polygon -> "group select" I could select the individual planes (I even did not had to use your mentioned "split")
But when I want to do the same with element "quadrat" that does not work, I can only select one of the four sides after splitting, but not one of the individual elements, so using the split function is splitting the four sides of the whole quadrat, but does not let me select individual planes... what I am doing wrong?
polygons and drag the material on the object in the preview window.
To apply a material to an entire object, drag and drop in the Browser list.
There is no reason to split the bridge into separate objects.
GS089
Member
Ah, that was the solution, thanks, I thought it already had been in edit mode because I saw the dots in that little symbol.Are polygons available, or are they part of a creator/ modifier object? In the latter case you need to make it "editable" first to get a polygon-object.
ZooHead
0
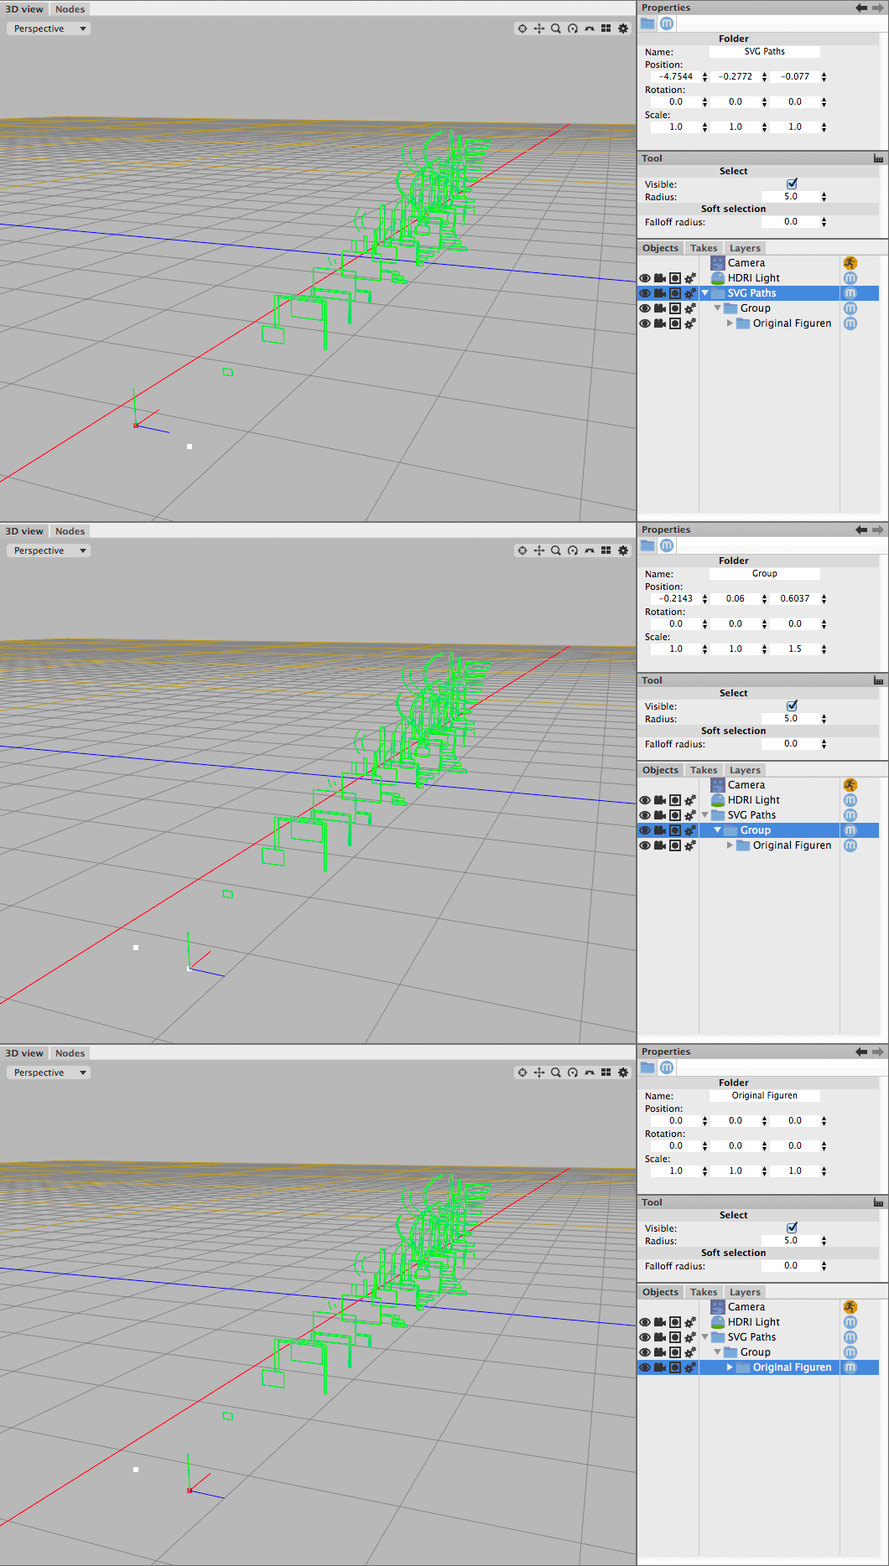
One of the things I'm trying to do for Gerald is to create a good workflow that that starts with the SVG splines made in Illustrator.
Until recently I was overlooking something important I'm going to call Folder Offset.
It occurs when something is placed in a folder and the folder is moved in in 3D space.
It can be further compounded by placing that folder into another folder and moving it.
Now we have a Double Folder Offset.
In this case that's what happened here, as you can see in the Properties Panel,
there is also a one directional scale change made to one of the folders.
ZooHead
0
Cheetah behaves differently if you drag an inner folder and drop it outside the enclosing folders.
In that case the transformations of the Parent object is inherited by the child object.
If you hold the Shift key before dragging, the child will lose it's inheritance, just like with Copy and Paste.
In that case the transformations of the Parent object is inherited by the child object.
If you hold the Shift key before dragging, the child will lose it's inheritance, just like with Copy and Paste.
ZooHead
0
When I started playing with Gerald's file, I immediately copied and pasted the Original Figuren file into a new document.
That erased the scale factor and moved the whole thing into left field.
Now I see how I missed the scale factor and have been working out in left field.
Using a folder to scale a large number of Splines all at once from the
same point is a great idea as long as you Burn the Transformations.
Burning Transformations of many things is not hard if you use the down arrow key
to move through the list, and one at a time and hitting the button for each.


