You are using an out of date browser. It may not display this or other websites correctly.
You should upgrade or use an alternative browser.
You should upgrade or use an alternative browser.
Bend Modifier Zone of Influence
- Thread starter ZooHead
- Start date
ZooHead
0
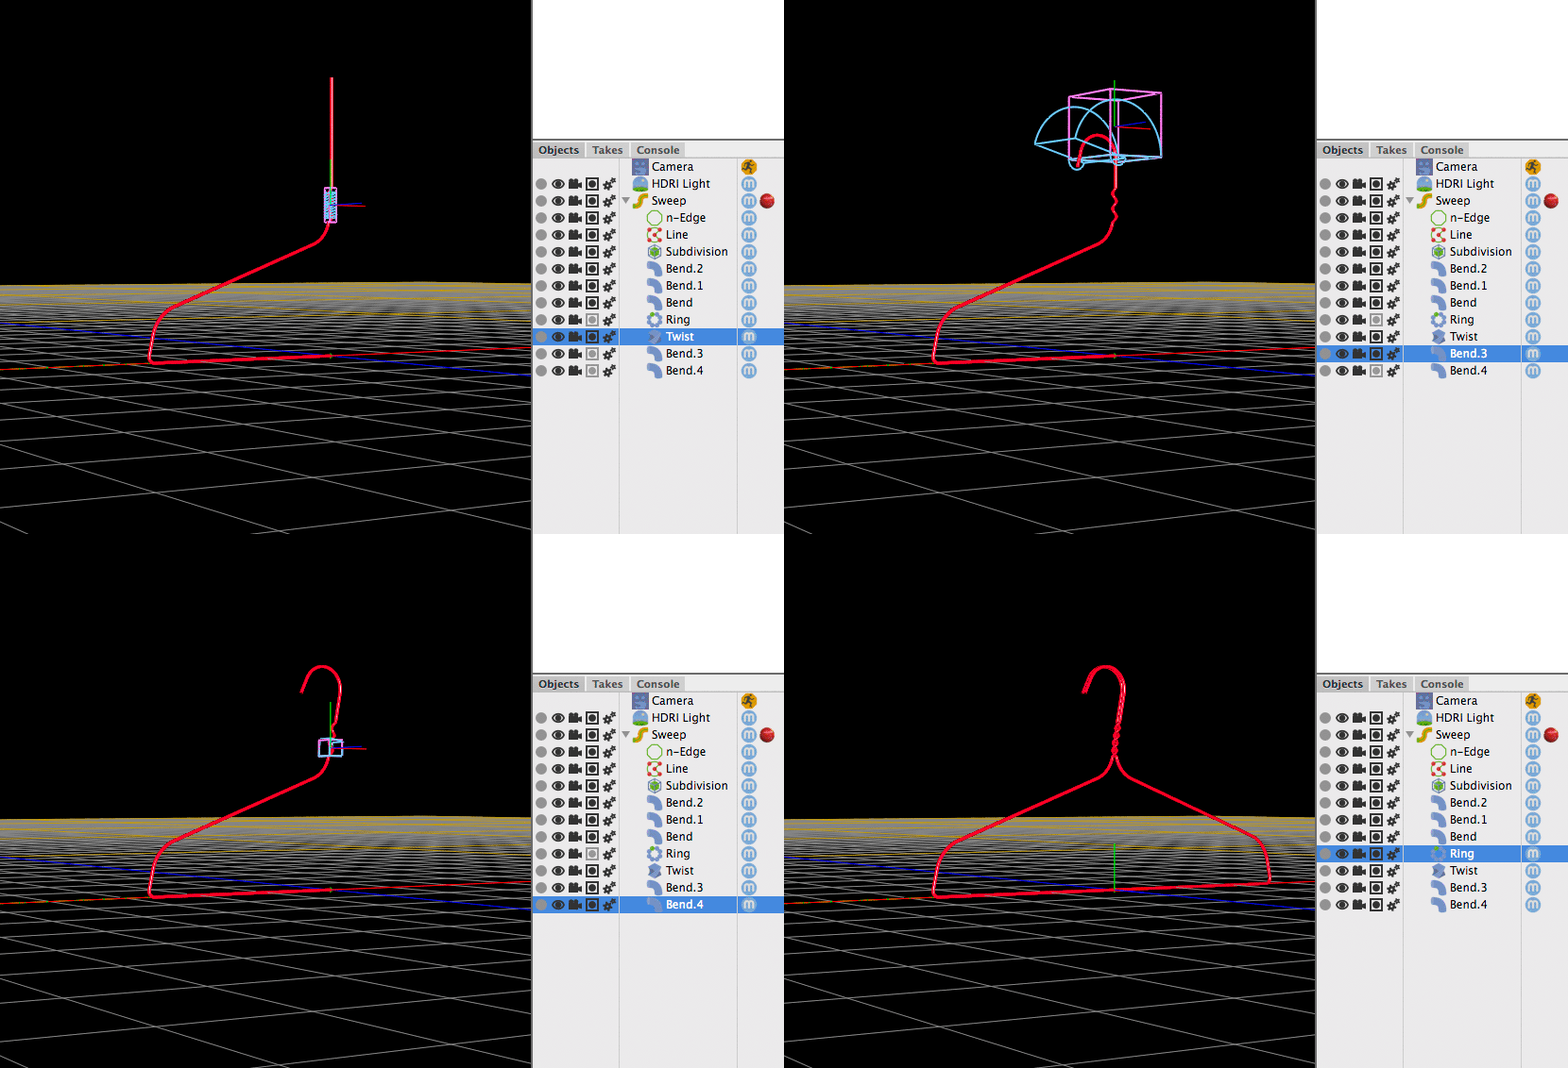
Up until now I've been placing the Bend Modifiers along the actual object.
You can also do it along the modified objects path and sometimes you can do it both ways.
This gif shows the BMs placed along a Spline/Sweep cylinder.

This one shows a Twist Modifier and two BMs along the modified path.
They are placed after the Ring Modifier so the bends are in one direction.

You can also do it along the modified objects path and sometimes you can do it both ways.
This gif shows the BMs placed along a Spline/Sweep cylinder.
This one shows a Twist Modifier and two BMs along the modified path.
They are placed after the Ring Modifier so the bends are in one direction.
Attachments
ZooHead
0
Here's a good one for anyone trying to use Bend Modifiers
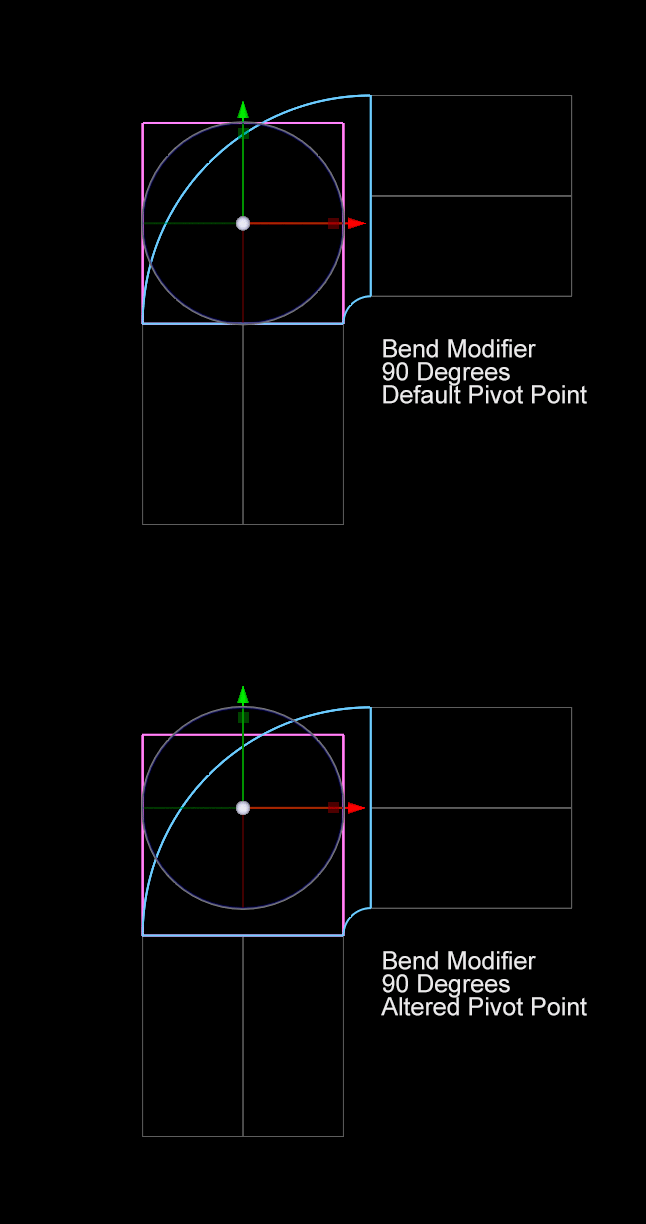
to make pipes or a path or roadway that is aligned to a grid.
For this type of system you would probably stick to 90 and 45 degree corners and maybe 22.5.
The problem is the Bend Modifiers pivot point is only aligned with it's Y axis and every
angle would require a different pivot point position, so in this case three custom BMs.
You can use Cheetah's Pivot Mode to alter the pivot points.
Joel
0
Thanks again Zoohead for explaining a confusing tool, particularly your clear explanation of how the “Zone of Influence” extends to infinity. Yesterday astronomers reported an anomalous perturbation in Earth’s movement in its orbit at the exact same moment I was using the Bend Modifier. Coincidence?
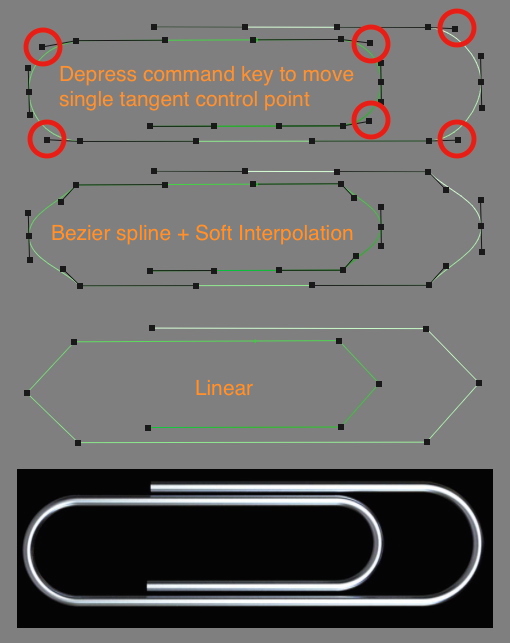
I use the Bend Modifier occasionally, but for a simple example like your tubes with multiple precise bends, I would use a spline path for a Sweep. A paper clip is flat on one plane, so that makes it easier compared to something with compound bends in 3D space. I don’t do animation, so the following tips are intended for beginners who might think splines are mysterious and hard to use.
Splines are powerful and essential for most of my designs. Here are four handy techniques I use regularly to create and tweak splines, usually to make a path for a Sweep:
1) A spline can be quickly started with the Properties set for “Linear” to set hard angles. Then switch to “Bezier spline” and select curve points and change to Soft Interpolation. That gets me close to what I want, then I do a little tweaking. (I added keyboard shortcuts for Spline Tool adjustments: Y = Hard Interpolation, U = Soft Interpolation.)

2) Per Frank Beckmann: Use horizontal and vertical nodes for a flat spline:

3) For more complex curves, there is a Controlled Spline script from Hiroto Tsubaki that starts with a series of small cubes placed in 3D space to guide where the spline passes through. It’s easy to position the cubes and set the curves to create very complex and precise 3D splines.
https://www.cheetah3d.com/forum/index.php?threads/13464/post-118002
4) Another extremely useful script from Hiroto: PolygonToSpline lets you derive a spline from an object.
https://www.cheetah3d.com/forum/index.php?threads/13464/post-117994
I use the Bend Modifier occasionally, but for a simple example like your tubes with multiple precise bends, I would use a spline path for a Sweep. A paper clip is flat on one plane, so that makes it easier compared to something with compound bends in 3D space. I don’t do animation, so the following tips are intended for beginners who might think splines are mysterious and hard to use.
Splines are powerful and essential for most of my designs. Here are four handy techniques I use regularly to create and tweak splines, usually to make a path for a Sweep:
1) A spline can be quickly started with the Properties set for “Linear” to set hard angles. Then switch to “Bezier spline” and select curve points and change to Soft Interpolation. That gets me close to what I want, then I do a little tweaking. (I added keyboard shortcuts for Spline Tool adjustments: Y = Hard Interpolation, U = Soft Interpolation.)
2) Per Frank Beckmann: Use horizontal and vertical nodes for a flat spline:
3) For more complex curves, there is a Controlled Spline script from Hiroto Tsubaki that starts with a series of small cubes placed in 3D space to guide where the spline passes through. It’s easy to position the cubes and set the curves to create very complex and precise 3D splines.
https://www.cheetah3d.com/forum/index.php?threads/13464/post-118002
4) Another extremely useful script from Hiroto: PolygonToSpline lets you derive a spline from an object.
https://www.cheetah3d.com/forum/index.php?threads/13464/post-117994
ZooHead
0
@Joel Great info. I also use splines a lot, probably because of
my use of Illustrator over the years has made them so familiar.
More tips on spline manipulation:
With the Transform Tool set to Move, press Option/Shift and you don't have to select the point first.
Add Cmd to that and you can move one control point at a time without selecting it first.
Option/Shift/Cmd also allows opening a closed Spline at the break point, again without selecting it first.

