Interior Lighting Experiments

@Daemoc Thanks for starting this thread. I've wondered how to deal
with inside lighting like this but haven't really done any testing.

I look forward to see what you come up with.

@Hasdrubal I wish there was a way get the HDRI lighting to emanate from only inside a room.
Can you maybe turn the room inside out, bake it then flip it around again? Is that crazy? 🤪

I any case here's my scene with the area light replaced with a point light moved far away.
With the Attenuation Off there's no light fall off so distance won't diminish the light.

I used an HDRI for ambient light called StudioF I think was from one off our members.

PS: Point light intensity setting of 3

Window hard Light Afternoon.jpg
 
@Hasdrubal I wish there was a way get the HDRI lighting to emanate from only inside a room.
Can you maybe turn the room inside out, bake it then flip it around again? Is that crazy? 🤪

I any case here's my scene with the area light replaced with a point light moved far away.
With the Attenuation Off there's no light fall off so distance won't diminish the light.

I used an HDRI for ambient light called StudioF I think was from one off our members.

PS: Point light intensity setting of 3

Uh, the main problem here is Cheetah. The lights need an overhaul.

In other apps it's possible to use Lights with texture or to create real "mesh lights" (not only emanating light from the texture, but, well, any object as a light source, also able to be combined with a texture). So you just use a hdri as texture for you light, and that's it. So you could combine as many hdris as you want (for example with "light cards"). I use area lights very often with the texture of a real diffusor, so it's reflection is the same as it would be inside a studio. And that adds realism.

Without that, I simply would use an area light for the window and a hdri for the inside (and as Frank mentioned, there are these portal llights, which don't emanate any light but just bundle the rays). That should function well enough (even if there isn't any window glass, which of course would be another level of realism, at the cost of rendering times. Sometimes you see the difference, sometimes not.

Here you have another problem. The picture outside doesn't fit the the inside (the colors are way overblown), and in a real foto you wouldn't see it as well as here (it would be hell of a lot brighter, looking at the interior, almost white). An the point light is the most unreal thing available in the world of 3d, only topped by a point light without light falloff. So I literally never use them ((it's good to have 'em around, though, in case you need some cheating). Sun light would be better, or the area light, which in my view harmonizes best with a hdri.

What you could try, though, would be to stitch two halves of an inside and an outside hdri together in the painting app of your choice. For realism the "outside half" would have to be brighter then the "inside half". If you position that light carefully enough, then you had just your hdri for the whole scene (but those two would have to fit together also from the light situation of the inside half). Never tried that out, never heard of someone doing it, never read about it. You'd be the first to try.

The actual problem isn't even the light. It's all the stuff inside a room, be that a bathroom or a living room. If all those objects are inside the room, you don't need an inside hdri anymore. But the idea with baking, well you can try, but I don't think that it's worth it and that it really would function.


And as a p.s. about denoisers:
I forgot to mention that one of the downside is simply, that they don't work that well with anymations. You can get a lot of flickering (the different apps sometimes have ways to deal with that, for example with adding the denoiser after each iteration ...).
 
@Hasdrubal You make some really good points. After all HDRIs make lighting easy why make it harder.
In a small space adding lights is not a problem, and I can still use an HDRI for ambient light if I remove a wall.

On the set of a Hollywood sitcom, all walls are moveable and there is no ceiling.
Above the set are where the Grips work setting up the lighting.

I built an LED desk lamp and used two rectangular area lights in a long v shape to
throw some light to the sides. I also made them Visible In Camera
as well as washing out the outside image with Mix Color.

Window Light.jpg
 
I seem to recall getting rid of it once by using a 2D Plane object instead of a 3D Box object as the glass window pane.
I am going to give this a shot. My glass is indeed 3D. As of right now I have been making the booster lights physical size the same as the window then backing it off far enough away so they are not in view. It works, but does add a false shadow up the wall /door.

Lower the Smooth angle and check if this helps.
I have tried this and it is still a no go. I think I am just going to have to rebuild the walls. I have had meshes behave this way occasionally after cuts. Sometimes no matter how aggressive you get with the points merge, they just refuse. The easy test is subdividing the mesh which shows the issue right away. I should have done this a long time ago and saved myself a lot of time.

You make some really good points. After all HDRIs make lighting easy why make it harder.
In a small space adding lights is not a problem, and I can still use an HDRI for ambient light if I remove a wall.
This is the root of the issue I am having. I cannot fake this because the final result will not be a static image. This is going to be a fully interactive 3D model that you can see from any angle. I am trying to bake the lighting into textures for realtime use.

@frank beckmann hit the nail on the head. There is just not enough light able to pass through the window to properly light the room. Not at the default exposure anyway. I think upping the exposure is probably the proper way to look at this from a real world perspective as your eyes/camera adjusts to the light level, but the low light just kills the sampling for some reason. Using my 2000 sample render as a example, there was not much of an improvement in noise from 1000 - 2000 samples. At that rate, it never would look right no matter how long I let it cook. There may be more to this using different clamp settings, but I have had no luck finding it yet. I don't fully understand all of these settings which is part of the problem.

As of now, I am happy enough using booster lights to do the job. I have spent another day doing 250spp renders and think I am happy enough to commit to a 1000spp for a final test.

Time will tell.
 
Getting better...
New1k.jpg
I think I am going to take this test room and finish it just for poops and giggles. I need to make more items for my bathroom remodel anyway so the modeling will not go to waste.
 
I have tried this and it is still a no go. I think I am just going to have to rebuild the walls. I have had meshes behave this way occasionally after cuts.
What else I tried in this situation is set the transform tool Orientation: Normal - select the critical portion and scale along the normals.
Or select the edge loop around the "opening" and toggle crease and set Smooth: Normal break.
And be aware bending a quad can happen by accident easily. Could you upload just this part of the wall showing the issue for further inspection?
 
I have tried this and it is still a no go. I think I am just going to have to rebuild the walls. I have had meshes behave this way occasionally after cuts. Sometimes no matter how aggressive you get with the points merge, they just refuse. The easy test is subdividing the mesh which shows the issue right away. I should have done this a long time ago and saved myself a lot of time.
Try selecting all the panels on that side of the wall, and dramatically flattening them using the scale tool. Even though the numerical interface may display the same coordinate value for all of them, [ edit: C3D ] sometimes uses more decimals internally (often created by computer chip math irregularities when calculating the location of points created by boolean processes - instead of being 0, it might be 0.000000023 ) and rounds them for the display. You may be seeing that rounding error.

(It's been a long couple of days - I accidentally named the wrong application. Fixed now.)
 
Last edited:
Getting better...
View attachment 37647
I think I am going to take this test room and finish it just for poops and giggles. I need to make more items for my bathroom remodel anyway so the modeling will not go to waste.
The lighting is looking good.
Though, I think the scene would be more realistic if the main character were taking a selfie while looking in the mirror ;)
 

Attachments

  • alien_posing_small2.jpg
    alien_posing_small2.jpg
    226.3 KB · Views: 240
Last edited:
@frank beckmann
I have already rebuilt the walls using booleans rather than cutting holes in a mesh. This seems to happen to me a lot though. I had a similar issue when modeling the receptacle wall plate. The next time it happens I will upload the model so you can have a look. I would like to know what I am doing wrong as well. (This always happens when I use the cut tool. Sometimes it seems like a single vertex normal is flipping rather than a face normal, can you flip vertex normals? I have never tried that.)

@MonkeyT
I have indeed tried that. I have noticed vertices moving off axis when moving points along a given axis. This seems to happen more often when the mesh is part of a group that has been moved from it’s original position. It can be frustrating for sure.

@jdmac
Thanks!
I will do a render of something like that when I get around to modeling a phone. (I can always use a phone model anyway)

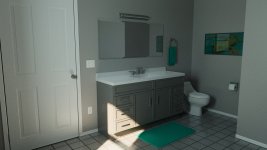
Made a few changes and added a few things…
073121.jpg
That rug looks horrible. (So do the vanity cabinets honestly.) The cabinets I know I can fix when I stop being lazy and model them properly, but that rug I am not so sure about. I don’t think I can create a convincing shag carpet like texture just with materials. I am not too worried about it though, just thinking out loud.

As for the level of detail, here is an example of what the final idea will look like…
3-4Test.jpg
This render is representing the camera view of the realtime in game view. You will be able to rotate the camera as well as take a peak in first person. All lighting will be baked into the textures so the only thing being rendered by the GPU will be polygons and textures. In the end it should look good and be able to run on a potato.

Obviously the character will not be rendered with the room during the bake so that will stick out a bit, but it will be worth the performance gains.
 
Last edited:
That rug looks horrible. (So do the vanity cabinets honestly.) The cabinets I know I can fix when I stop being lazy and model them properly, but that rug I am not so sure about. I don’t think I can create a convincing shag carpet like texture just with materials. I am not too worried about it though, just thinking out loud.
Maybe consider a PBR for the rug.
Example:
 
Maybe consider a PBR for the rug.
Example:
Wow! Those mats look impressive.
Thanks for the link. I have bookmarked that page.

I want to build and texture everything myself for now, but I may use those later once I go for a finished product. I don't think I could ever come close to matching those with the tools I have.
 
I want to build and texture everything myself for now,
A few years ago, I modeled some grass ...

... which someone else used for hair ... which looked like a shag carpet :)
 
Sweet, I just might have to look into that. That's the point of this entire post now. To finish this room I am going to have to model things I normally wouldn't and it forces me out of my comfort zone.

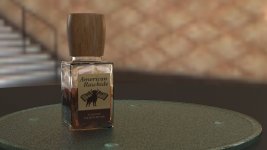
I just did a glass bottle for the first time.
ARH.jpg
The glass is too thin and the neck is too large, but it was just an experiment. (I made the mistake of adding the bevels before I shelled it. If I made the offset any larger the interior bevels would intersect.)

I fixed my vanity cabinets as well.
080521.jpg
I am still not 100% happy with them, but they are much better than before.

Thanks for the links again. (y)
 
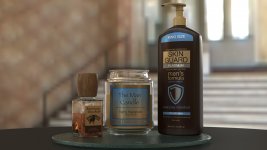
Your heroine seems to have a lot of products for men. The models are well done, of course, but for me the labels are the highlight. They look very convincing and professional, and the candle is simply hilarious. 😆
 
Thanks Hasdrubal. The satire labels/brands are surprisingly fun to do.

I built another bottle, but I cannot figure out how to "paint" a texture directly onto dielectric "glass".
080721b.jpg
I spent way too much time trying to get that to work and it is way past my bedtime. It's funny how the simplest of things can cause the most headache sometimes.

Maybe I will have better luck tomorrow.
 
Ah - fake CoolWater. Well done. 👍
Thanks. (y) Most of these items are just spoofs of things I have laying about.

If you don't mind my asking, how did you get the text/logo on the glass? Is that an actual mesh, or are you mapping a texture somehow?
I had no luck at all with textures and glass.
 
Back
Top