New Home

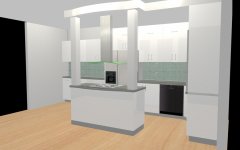
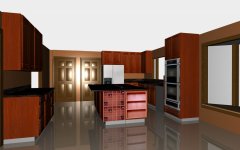
This is a rendering of the model used to derive the design of our new home. It was great to be able to "walk through" the house and determine interferences and design issues with all those roof intersections and windows. Many issues were avoided and the builder and contractors we able to avoid costs and delays. Details like the kitchen design, the fireplace, the 2nd floor bridge and it's cable railing really add to the design concept and the result is pretty impressive.

I love using Cheetah3D for home project design. I welcome comments, critique and questions.


smsteelroof.jpg
smarchroof.jpg
 
That's great. Very cool. Thanks for sharing. I've sone some similar stuff when we were doing renovations.
 
Awesome! Renovations are particularly tricky because one never knows what they will find once the work begins. I remodeled my kitchen and removed some structure in the process. It was a challenge to get good measurements to put into Cheetah before the first bit of work was done.
 
Nice job on the fixtures! How did you get a picture that big to upload?

The thing that I learned about bathrooms is that the smallest rooms take the longest time to build to detail. I did 2 of them recently and the nearest thing I can figure is that when you build a house, you install the tub first. 🙃

My Dad is both an engineer and a carpenter: I grew up with a drafting table in my room and access to most imaginable measuring tools, so as I found fixtures on clearance, I just built the models as independent projects by measuring the real objects.

The picture is a compressed jpeg via Affiinity Photo.

Fortunately, this room is just 1/3 of a Jack&Jill. The shower/toilet room was handled by professionals when the shower pan (upstairs) developed a leak, which started this whole mess. The hard part of envisioning it is that the wall on the left side is 135° to the mirror, and the room is so small, you can't get a naturalistic render from the floor to the ceiling.
 
Finished kitchen in my previous home.
c5ce6b284806ea9aede26a751108ed84l-m1od-w1024_h768.jpg

My Dad is both an engineer and a carpenter: I grew up with a drafting table in my room and access to most imaginable measuring tools, so as I found fixtures on clearance, I just built the models as independent projects by measuring the real objects.

The picture is a compressed jpeg via Affiinity Photo.

Fortunately, this room is just 1/3 of a Jack&Jill. The shower/toilet room was handled by professionals when the shower pan (upstairs) developed a leak, which started this whole mess. The hard part of envisioning it is that the wall on the left side is 135° to the mirror, and the room is so small, you can't get a naturalistic render from the floor to the ceiling.
Apparently when you attach a file, you have to click the insert button and select thumbnail or full size. Fixed.
 
My Dad is both an engineer and a carpenter: I grew up with a drafting table in my room and access to most imaginable measuring tools, so as I found fixtures on clearance, I just built the models as independent projects by measuring the real objects.

The picture is a compressed jpeg via Affiinity Photo.

Fortunately, this room is just 1/3 of a Jack&Jill. The shower/toilet room was handled by professionals when the shower pan (upstairs) developed a leak, which started this whole mess. The hard part of envisioning it is that the wall on the left side is 135° to the mirror, and the room is so small, you can't get a naturalistic render from the floor to the ceiling.
I too created individual objects then combined them into the big model as needed. As a result I have a huge pile of .jas files with every imaginable intermediate object.

To get away from so much work, though, I also use photos to provide to texture surfaces. It may look flat but my goal is to get the overall design right, not necessarily down to the smallest detail.

On the other hand, I am still toying with the idea of putting clapboard siding on the new house model since the actually house has it.... nah.... too much work.
 
Nice models and renders Razz / Monkey. I have no experience with carpentry and renovations other than just watching or reading tutorials and giving it a try. Most of my architectural renders were to test paint and floor finishes. And sometimes to move furniture around. I've done a few at work that show some architectural elements, since I work as a graphic designer at a sign company. So sometimes it's helpful to show the signs in an environment instead of floating in space.

I was a beta tester for Live Interior 3d (which is called Live Home 3d now) and I got a license for it for free. I ended up eventually buying a discounted upgrade for the "Pro" version. Which is pretty cool. The main thing I wish it had is a way to do sloped terrain. But it can make it quicker to create a beginning model of a structure and then import into C3d (or another) app for finishing.
 
I have to laugh, Swizl, because I've had some ideas for a structure and it wasn't until I modeled it in C3D that I realized that anti-gravity hasn't been invented yet so I had to design in some more structure to hold things up properly! LOL

I have a dirty secret though. I've used Sweet Home 3D to quickly lay down some lines to get a design started. You can work in 2D and 3D and even export a .obj file to C3D. I would take the .obj file and build around it and get rid of it eventually once the Cheetah work progresses far enough. The trick is to keep your dimensions right because they don't always translate like you need them to.
 
Yep, I've used Sweet Home before, as well as SketchUp. Sometimes I have a specific purpose to use one over the other, but usually it's just because I want to try something new out.

My wife is always the, let's just start it and see what happens. Where I like to measure and plan everything out. :p
 
Back
Top