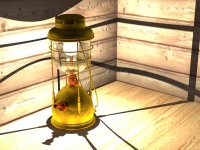
OK, here's my shot. It's a hack, but it's a groovy, math-laden hack. All rendered, no post-processing.
View attachment 36766
It seems that I have managed to put an object around the light sources (which is what I attempted), but actually, the effect comes from the material of the glass surrounding the light sources. It's the CGI equivalent of an optical illusion, and the only reason it works is geometry.
Some of you know that in my toying with custom Materials, I've been experimenting with a property of the State Node called I•N (which means "the dot product of the Incidence and Normal vectors"). The gist of that property is that if a surface faces the camera's raytracing vector, I•N = 1, but if it is perpendicular to the raytracing vector, I•N = 0. Think of yourself standing on the shoreline of a calm lake. If you look down near your feet, you can see through the water to the sand and rocks beneath the surface. But the farther out you look at the water, the more it reflects the sky, hiding whatever is underneath the surface. That's how I•N works.
So, since the light sources within the lamp are exactly in the center of a cylinder, whenever you look at the light source, you are looking through polygons of the cylinder that almost directly face you. So, If I used the Emissive property of the glass material, the polygons between the camera and the light sources would glow, brightly if they were directly between, and less brightly as they became less directly aligned between them. (This will work when you are viewing centered lights through the side of a cylinder, or through any part of a sphere. ) The trick is that if I made the glass 100% transparent, it lost all the reflective/specular characteristics of the glass material, but anything less exposed the Diffuse color wherever it wasn't glowing. So, in the end, I needed to use the I•N property twice: once for the Emissive property, and once for the Transparency Property.
Note: leaving anything but a 1.0 IIndex of Refraction has a serious impact on the combination of Transparency and Emissive properties.
When I experimented with it, mixing them in equal portions didn't look good, so I divided the I•N value by 2 so that it would never be more than have a value greater than 0.5, and I use a Gradient Filter to customize the Transparency property, to help mostly-hide non-glowing parts of the Material. While tinkering, I discovered that exposing the Emissive characteristics on both the directly facing polygons AND the almost tangential polygons improved the glow effect.
The final secret is to use a Render tag! By unchecking the "visible in shadows" property, the not-quite-as-transparent-as-I-would-prefer glass material casts no shadows!
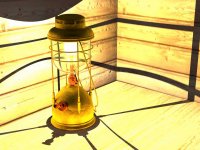
In this model, I used two different variants of this Material: one on the glass, and one on a Capsule object meant to add some slightly more physical aspect to the two Area Lights.
View attachment 36764View attachment 36768
Enjoy!