
You are using an out of date browser. It may not display this or other websites correctly.
You should upgrade or use an alternative browser.
You should upgrade or use an alternative browser.
Artists impression
- Thread starter Charless
- Start date

Helmut
0
* There are a stack of matters you can look at:
* Masonry:

* The texture of the brickwork on the corners (of the building / to openings) is clearly incorrect. Applying a pattern to geometry so that it fits at edges is not so trivial.
* The bricky pattern must fit the dimensions (X & Z, any horizontal length between ends) of the wall. Zooming in on your image shows that you start at many edges with tiny slivers of a brick which won´t survive.
* I have no idea if the ground floor is full brick or masonry veneer. The bond implies full brick. In any case, if masonry veneer. you need to show weep holes at the bottom of the external walls.
* I am also suspicious of the brick size you are showing. These are certainly not standard sizes and this may complicate the maths of fitting textures to topology.
* Timber Cladding:

* Normally, these are just horizontal boards, which are slightly angled for overlapping. No doubt there exist more expensive grooved / tongued cladding strips.
* Attic & dormers:

* A glimpse of the interior of the upper level indicates that the roof construction is paper-thin. This should to be 30cm minimum (rafters plus insulation plus air space). As you are using monk & nun tiles of a dark colour you are already heating up the attic. Depending on the location of the cottage this may make sense or be a waste of energy unless an upstairs sauna is envisaged.

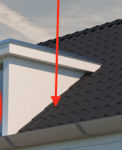
* There needs to be a flashing, generally galvanised steel, at the bottom edge of the sidewalls of the dormer. Otherwise precipitation just seeps in. The same applies to the edges of the roof. In the case of the roofing tiles you have chosen this may require concave tiles at relevant edges.
* Reflections:

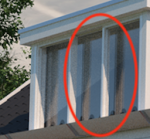
* There is an inconsistency in the reflected outside natural environment. In one window I observe some grass and foliage in the distance, in others I see a flat plane to the horizon.
* Windows Transparency:

* This shows objects which I can not interpret. There are greyish frames visible which are a mystery.
* 3x3 openings

* These may possibly be French windows, consisting of a 2x3 door and a 1x3 side panel. If so, the frames should show the two panels, possibly even by rotating one of the panels to show an open leaf.
* Masonry:
* The texture of the brickwork on the corners (of the building / to openings) is clearly incorrect. Applying a pattern to geometry so that it fits at edges is not so trivial.
* The bricky pattern must fit the dimensions (X & Z, any horizontal length between ends) of the wall. Zooming in on your image shows that you start at many edges with tiny slivers of a brick which won´t survive.
* I have no idea if the ground floor is full brick or masonry veneer. The bond implies full brick. In any case, if masonry veneer. you need to show weep holes at the bottom of the external walls.
* I am also suspicious of the brick size you are showing. These are certainly not standard sizes and this may complicate the maths of fitting textures to topology.
* Timber Cladding:
* Normally, these are just horizontal boards, which are slightly angled for overlapping. No doubt there exist more expensive grooved / tongued cladding strips.
* Attic & dormers:
* A glimpse of the interior of the upper level indicates that the roof construction is paper-thin. This should to be 30cm minimum (rafters plus insulation plus air space). As you are using monk & nun tiles of a dark colour you are already heating up the attic. Depending on the location of the cottage this may make sense or be a waste of energy unless an
upstairs sauna is envisaged.* There needs to be a flashing, generally galvanised steel, at the bottom edge of the sidewalls of the dormer. Otherwise precipitation just seeps in. The same applies to the edges of the roof. In the case of the roofing tiles you have chosen this may require concave tiles at relevant edges.
* Reflections:
* There is an inconsistency in the reflected outside natural environment. In one window I observe some grass and foliage in the distance, in others I see a flat plane to the horizon.
* Windows Transparency:
* This shows objects which I can not interpret. There are greyish frames visible which are a mystery.
* 3x3 openings
* These may possibly be French windows, consisting of a 2x3 door and a 1x3 side panel. If so, the frames should show the two panels, possibly even by rotating one of the panels to show an open leaf.
Attachments

MonkeyT
0
As Helmut pointed out, there are a lot of little details about roof construction we usually take for granted, and when we don't find them, it just feels unnatural.
When you look straight down upon a roof, all you should see are shingles, because their main goal is to direct rain away from all of the wood, which becomes vulnerable to moisture as soon as weather strips away its paint. So, the top edge of your roof should have a rounded layer of shingles laid across it called a ridge cap - which sheds water onto the shingles. Then, the shingles should overlap the tops of the fascia boards on the roof's edge by about a quarter inch. The eaves are the roof's overhang, and they hold the fascia a foot or two away from the walls of the house, depending upon the style. Rain gutters are then mounted on the front of the fascia boards (the inside lip is also overlapped by the shingles) to catch the water being shed by the roof. The metal flashing Helmut mentions is flush against the wall, mounted behind siding or against brick and sealed at the top, and L-shaped, with the flat bottomtucked under laid above* the shingles so that water running down the wall is channeled downhill, away from where the wall meets the roof deck.
Oh, and the weird reflections in the upstairs window might be caused by the pane of glass being set a few inched behind this window frames instead of flush with them.

* edit - it's been a long time since I roofed a house.
When you look straight down upon a roof, all you should see are shingles, because their main goal is to direct rain away from all of the wood, which becomes vulnerable to moisture as soon as weather strips away its paint. So, the top edge of your roof should have a rounded layer of shingles laid across it called a ridge cap - which sheds water onto the shingles. Then, the shingles should overlap the tops of the fascia boards on the roof's edge by about a quarter inch. The eaves are the roof's overhang, and they hold the fascia a foot or two away from the walls of the house, depending upon the style. Rain gutters are then mounted on the front of the fascia boards (the inside lip is also overlapped by the shingles) to catch the water being shed by the roof. The metal flashing Helmut mentions is flush against the wall, mounted behind siding or against brick and sealed at the top, and L-shaped, with the flat bottom
Oh, and the weird reflections in the upstairs window might be caused by the pane of glass being set a few inched behind this window frames instead of flush with them.
* edit - it's been a long time since I roofed a house.
Charless
0
Thanks for your wunderfull comments, Okay: Let me explain. I am trying getting better at modeling and rendering of architecture; its what refered at Artists Impression. That doe not imply its has to be not accurate. As reference I use whatever I can find in specification drawing of buildings, they are not good quality, but that is no issue for now. I cheated a lot in this render for the purpose of speed and limited knowledge of 3D moddeling and UV's but I am learning along the way. I am a (graphic) designer but Covid dried up all my clients. Almost no Income. So what to do? Reinventing Myself. That took a while before I realised that when I was younger lets say 29 years ago I earned good money by drawing and airbrushing those perspective Images for project developers. But then Apple came around and I had to switch to digital media. Houses wil be build now and in the future and by selfstudy in C3D I hope I can sell them. This is a goal and I have to keep bussy, I have some saving but eventually they will dry up....Anyway I will aim for this quality as a benchmark
https://www.topr.nl/nieuwbouw/artist-impressions/
https://www.topr.nl/nieuwbouw/artist-impressions/
BTW Helmut: "This shows objects which I can not interpret. There are greyish frames visible which are a mystery." these are the rooftiles showing, cause I forgot a bolean
. As reference I use whatever I can find in specification drawing of buildings, they are not good quality, but that is no issue for now. I cheated a lot in this render for the purpose of speed and limited knowledge of 3D moddeling and UV's but I am learning along the way. I am a (graphic) designer but Covid dried up all my clients. Almost no Income. So what to do? Reinventing Myself. That took a while before I realised that when I was younger lets say 29 years ago I earned good money by drawing and airbrushing those perspective Images for project developers. But then Apple came around and I had to switch to digital media. Houses wil be build now and in the future and by selfstudy in C3D I hope I can sell them. This is a goal and I have to keep bussy, I have some saving but eventually they will dry up....Anyway I will aim for this quality as a benchmark https://www.topr.nl/nieuwbouw/artist-impressions/
https://www.topr.nl/nieuwbouw/artist-impressions/
BTW Helmut: "This shows objects which I can not interpret. There are greyish frames visible which are a mystery." these are the rooftiles showing, cause I forgot a bolean
I understand you and your situation fully (better than I would like), but that shouldn't be an explanation for the quality of an image. If you want to do architectural renders professionally you simply have to be better than the competition (which is probably your goal anyway). Actually, in architectural renderings it's still allowed to be recognizable 3D, so it's more or less in Cheetah's possibilities.
A lot of those architectural renders come straight out of CAD apps. For that quality they don't need an external 3d specialist. That comes into play when they want it to look a bit more convincing. But the one thing those renders never lack (or shouldn't) is the architectoral detail, all those things Helmut and Monkey pointed out (and to a much lesser degree myself). It doesn't have to be perfect, but exactly those details have to be correct, for example with the edges and the inner parts of the wall at the windows. It's not allowed to have something that looks strange or somehow irritating for a prospect buyer (or tenant). The only reason for such renderings is to sell a product that's not yet built (or at least not finished), so some artistic view is necessary; still, the details have to be there.
So, in all probability you'll get a CAD model which you then have to retopologize (or probably rebuild) or a 2D-CAD-Plan you have to build from. Never some poor quality drawings. The good thing is, a lot of this is free (often in a format Cheetah can't read, though. So you have to use another program to convert it (I never tried it out, but dwg files you proably can convert to svg via freecad).
Another thing is these renderings have to be shown where they will be built (there are exceptions, for example for pre-built houses). So you have to learn how to fit the rendered house into an existing photography.
Btw., what Monkey said about the reflections in the windows seems right. An explanation could be that the window geometry is flipped.
Helmut
0
* Which details to ignore / to consider is often a tricky point in modelling. In a commercial project this will depend on the available time & the budget, in a private experiment it is your choice.
* C3D allows to toggle on / off most objects / modifiers / materials of a project. When demonstrating a pilot project to a potential customer on site (or via emails) it can be useful to show some effective trickery by some simple clicks in the browser. Pointing out, of course, the additional costs (in € / $ / ...). Not surprisingly, clients want to see what they would get for more money.
* My advice to you (and many others in a similar CoViD-19 mess) is:
* Work as professionally as possible.
* Accumulate a library of standard elements (bricky walls, window frames, dormers, ...), of materials (brickwork, roof tiles, ashlars, concrete, ...) and props (shrubs, trees, random pets).
* As stated by Hasdrubal, you need to establish a style which sets you aside from the competition.
*
Good points by Helmut.
About the level of abstraction there are a lot of other things to consider, especially the customer and the project itself (if the house is only seen from far away ... and so on). At least for this stuff you don't have to be as realistic as possible (realism would mean dirt, as an exaggerated example some bird-shit on the roof, graffity, garbage, cigarette stubs on the streets and so on).
But one thing I wanted to mention before: Whenever possible do use some real photography as reference, some similar roof for example in a real photo.
So you'll need also a library of reference pictures.
And the second: There are quite some tutorials for architectural modeling and rendering around on youtube etc. They are made for other programs of course, but that shouldn't hinder you to watch them and try to translate that work into Cheetah.
Charless
0
..and improving, Your highly appreciated comments are always welcome!
<a href='https://postimg.cc/XX2YGq9m' target='_blank'><img src='https://i.postimg.cc/XX2YGq9m/2.png' border='0' alt='2'/></a>
<a href='https://postimg.cc/XX2YGq9m' target='_blank'><img src='https://i.postimg.cc/XX2YGq9m/2.png' border='0' alt='2'/></a>
MonkeyT
0
Thanks a lot guys! verry usefull and motivated info! How would you takkle the issue of the reflexion in the lower windo's where now its only the Cheetah SkyLight horizon reflected
HDRI Haven. Free HDRIs of suburban neighborhoods are tough to come by, but nice rural surroundings w/skies handle reflections like this very well. The lighting provided by HDRIs often appears more natural than SkyLighting.

MonkeyT
0
Looking good!
The sidewalk bothers me a little: it wraps around the house from the door but stops abruptly before connecting to the driveway or street. I'm also more accustomed to seeing sidewalks set slightly away from the building, so that some moisture can reach the foundation (Texas has lots of heat and lots of foundation shifting if the soil dries out). In fact, here, shrubs like those are usually planted right next to the foundations, or along the property boundaries.
You might consider adding a porch light, too.
Charless
0
Looking good!
The sidewalk bothers me a little: it wraps around the house from the door but stops abruptly before connecting to the driveway or street. I'm also more accustomed to seeing sidewalks set slightly away from the building, so that some moisture can reach the foundation (Texas has lots of heat and lots of foundation shifting if the soil dries out). In fact, here, shrubs like those are usually planted right next to the foundations, or along the property boundaries.
You might consider adding a porch light, too.
Thanks, good idea : sidewalks set slightly away from the building
Charless
0
BTW, my niece is married to a planner at engineering/construction company (contractor) I allmost forgot. I contacted him and he will provide me with some real detailed contruction data of to be realized construction projects (mostly residential buildup aereas) So I can practice my (3D) skills for real!. I will invest a lot of time in this, learning and improving and hopefully it pays off in the near future..
. I will invest a lot of time in this, learning and improving and hopefully it pays off in the near future..Helmut
0
Another great improvement. You have put work into many of the details and the model looks much better and more professional to me.* The stuff with the sidewalk being offset can be quite important. Generally (at least in Europe), there is a narrowish trench filled with gravel. There may be a perforated drainage pipe at the bottom which disperses rain water which runs off the brick walls and probably the rain pipe from the roof. As MonkeyT points out, moisture has a major effect on the stability of the foundations. Depending on the geology of the substrate it may be heat or rain or variations in the level of the groundwater which can cause structural damage.
* The offset also allows the building proper to settle (or rise) slightly without this instantly cracking the pavement / tiling of the sidewalk.
* I agree with Hasdrubal that the bokeh / blurry effects of green shrubs and purple leaves may need to be refined. Currently this seems too sharp and deliberate to my eye.
* Nitpick: The street looks extremely narrow. Once your neighbour has parked a car only residents driving a
motorised kangaroo can pass. However, this may not be a street but the driveway next door. It may also be an idea to slightly angle the adjoining cottages to avoid a severe case of architectural deja vu and confusing houses after a night of celebrations.* And yes, getting proper advice from a building engineer should be of great advantage. There is also much information on the internet on numerous details of residential domestic buildings. Don´t hesitate putting questions into the forum whenever you are stuck.
Charless
0
Thanks again for your comments (I'll buy you a drink) It is always good to let somebody else look at it, not only for the architecturial details. After 30 years as (graphic) designer I know you have to standback from a project for a while because sometimes orrurs a kind of detail and esthetic blindness.
I asked my 18 year dougther and she responded: Why cant we live there?
) It is always good to let somebody else look at it, not only for the architecturial details. After 30 years as (graphic) designer I know you have to standback from a project for a while because sometimes orrurs a kind of detail and esthetic blindness.I asked my 18 year dougther and she responded: Why cant we live there?
