
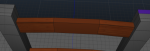
Trying to make a simple chair (see image). The back rails of the chair are extruded from the two uprights and then joined using the Bridge tool. When I apply a material to the rail the section which was created by the Bridge tool handles the material differently. Can anyone suggest how to sort this, thanks.
You are using an out of date browser. It may not display this or other websites correctly.
You should upgrade or use an alternative browser.
You should upgrade or use an alternative browser.
Materials question
- Thread starter plant
- Start date
Swizl
0
Hi plant,
Select your mesh and run the "Optimize" command (Right Click > Polygon > Optimize). You can also get there through the menu bar. I have my shortcut set to "o" since I use that command a lot. Once you enable the tool, you'll have to modify settings in the palette (if needed) and then click the Apply: OK button. This may not be the problem, but it's hard to say without having the file. If that doesn't work, just undo. Or you may want to either duplicate the mesh in the file or back the file up before trying this.
Select your mesh and run the "Optimize" command (Right Click > Polygon > Optimize). You can also get there through the menu bar. I have my shortcut set to "o" since I use that command a lot. Once you enable the tool, you'll have to modify settings in the palette (if needed) and then click the Apply: OK button. This may not be the problem, but it's hard to say without having the file. If that doesn't work, just undo. Or you may want to either duplicate the mesh in the file or back the file up before trying this.
Thank you both for getting back. The Optimise command didn't have any effect. I tried to use the UV mapper by clicking on the UV tab ,but haven't been able to find the Only selection check box.
Not sure whether its relevant but the whole chair is one object. I have two materials one is rotated so that i can show the grain correctly on each part of the chair. This works fine everywhere a part from the back rails mentioned. Thanks again
Not sure whether its relevant but the whole chair is one object. I have two materials one is rotated so that i can show the grain correctly on each part of the chair. This works fine everywhere a part from the back rails mentioned. Thanks again
Swizl
0
Thank you both for getting back. The Optimise command didn't have any effect. I tried to use the UV mapper by clicking on the UV tab ,but haven't been able to find the Only selection check box.
Not sure whether its relevant but the whole chair is one object. I have two materials one is rotated so that i can show the grain correctly on each part of the chair. This works fine everywhere a part from the back rails mentioned. Thanks again
I figured that the Optimize probably wouldn't help, but it's one of the first things I try. Is it possible for you to post the file here? If not, that's ok.
I am a little confused why your texture doesn't show at all in the middle section though. Usually if you apply a texture material, it does show up, even if it doesn't line up with the texture on the polygons next to it. You may want to check the material shade selection in the properties panel. You can have 25 materials per mesh (0 – 24).
Typically on a mesh this complex, you might need to create seams and then UV unwrap it, if you haven't already.
You can do this in the UV tab:
1. Set your seams
2. select your mesh
3. right click to call the unwrapping algorithm (LSCM or ABF)
4. orient the polygons as needed
5. Right Click save UV's to PDF
6. Use another software to line up your textures to the map. Once you save the texture map with all your textures lined up with the mesh,
7. you can save it out as a RGB bitmap
8. and then load the bitmap you just created into your material.
9. If everything is done correctly, once you put the material back on your chair, all the textures should be in place.
I do occasionally have to UV map, but it’s not my best skill when it comes to 3d. Most of my stuff is mapped to a plane or cube.
Frank has a really great UV mapper tutorial video somewhere. I'll see if I can find it if you haven't seen it already?
Swizl
0
So a quick test shows me that if you add polygons to a mesh that started as a primitive, that this will happen. The new geometry is not included in the UV map since all primitives have their own built in UV's. You can fix this either manually using the UV mapping with seams, as I called out, or using the UV Mapper like Zoo suggested. Something you will need to look out for if you use the UV mapper, is that the texture will tile across your mesh. So it will need to be adjusted somewhere in the pipeline. Either that or you'll need to use a seamless wood texture, but you still may need to adjust the scaling so the wood grain looks realistic. I had to reduce the size of my texture as it was too big to zip and attach here. You can have a look at my jas file though that shows the results of using both methods.


Attachments

Swizl
0
You're welcome! You can thank Zoo for the UV Mapper suggestion though. I never really use it, although I probably should familiarize myself with it more. Like I said earlier, most of my UV mapping is really really simple. Good luck with your project.Ah! I hadn't realised where the 'UV mapper tool was and using it seems to have solved my problem. I do appreciate your help so thanks again.