Joel
0
Adding a convex detail to the surface of a model is relatively easy. But designing with subdivision is tricky. Indenting a smooth seam into a subdivided surface is not intuitive. Trying to carve smooth seams with the Scalpel Tool seemed logical, but didn’t work as I’d hoped.
ZooHead’s method produced his exemplary HAMMERHEAD, with smooth curves and precise details like the taillights and windows. The subdivision is neat. His many relevant forum posts are good resources for understanding subdivision.
https://www.cheetah3d.com/forum/index.php?threads/10474/
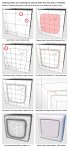
The attached tutorial explains the steps, as near as I can figure out. Adapting it for doors, windows, and other details should be straightforward. No attempt was made to step up small quads to larger ones or to avoid non-four-edge poles. The flat surface conceals them and the subdivision effectively smooths things out, as intended.
A step-by-step series of pictures with captions is my preferred way of taking notes. Having the whole process in a single JPEG makes it easier to see the changes and effects. Maybe some other C3D users can use it as a handy reference.
ZooHead’s method produced his exemplary HAMMERHEAD, with smooth curves and precise details like the taillights and windows. The subdivision is neat. His many relevant forum posts are good resources for understanding subdivision.
https://www.cheetah3d.com/forum/index.php?threads/10474/
The attached tutorial explains the steps, as near as I can figure out. Adapting it for doors, windows, and other details should be straightforward. No attempt was made to step up small quads to larger ones or to avoid non-four-edge poles. The flat surface conceals them and the subdivision effectively smooths things out, as intended.
A step-by-step series of pictures with captions is my preferred way of taking notes. Having the whole process in a single JPEG makes it easier to see the changes and effects. Maybe some other C3D users can use it as a handy reference.