Lipstick Group - Product render

Lipstick Group - Product render

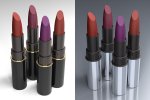
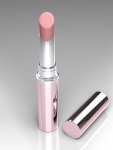
I have a client who is waiting for a lipstick product to arrive so they can go do a photo shoot and the deadline is approaching. I had some free time at lunch and decided to see how fast I could whip up a decent generic lipstick model. 20 minutes later I had this as my base model. Of course I played a bit longer with adding more colors and refining the textures, lighting and layout. My client was impressed. Cheetah is pretty awesome. We may not need to do the photo shoot after all :p
 

Attachments

  • LipStick-Groups.jpg
    LipStick-Groups.jpg
    96.3 KB · Views: 634
Thanks Pod. I've never played with SSS before. But with "waxy" objects like the pigments, I imagine the results would look less "plastic." I'm looking forward to ver. 7 and I hope SSS is part of the new renderer.
 
Nice work. Do you think you'd benefit from SSS if it were available?
If you´d go for a google image search on "lipstick" you´ll find not a single picture showing any SSS on the colored tip. It may contain different portions of waxes, oils and solvents, but the high amount of pigments will prevent light rays penetrating the surface. What you need instead is a pronounced specular size, some subtle blurred reflection and Fresnel enabled at the material site.

Cheers
Frank
 

Attachments

  • LipstickColor.jpg
    LipstickColor.jpg
    22.6 KB · Views: 582
Thanks for the direction Frank. I wasn't quite sure if SSS would get me more closer to realism. The truth about lip color is that it does have "some" show through when it is applied. Yes, some lip colors are "heavier" than others, but some formulations have more sheen or sparkle than opaqueness. So, in theory, a tiny bit of SSS could help in the lighter shades. I created a new model of the actual product in this image and I worked on the Material for the lip colors a bit more as well. There is some "sparkle" in all these colors as is to be expected in this particular formulation. This render is with 2 area lights, an HDRI and no radiosity. I'm kind of wavering on my HDRI choice, I like it and it kind of makes the cylinders look hexagonal in a way. Hmmmm. I tried a "softer" HDRI, but it lacked POP. Anyways, it's been a fun exploration. This render is all Cheetah, no post work. For the final I may do a composite after some client feedback.
 

Attachments

  • Actrice-LipGroup2.jpg
    Actrice-LipGroup2.jpg
    198.6 KB · Views: 599
the actual lipstick looks very believable to me in the latest render (although I'm no expert) - great work!!

--shift studio.
 
Thanks guys, getting this shot with actual product and a camera is difficulty. You have to use rubber gloves to avoid finger prints on the metallic surface and there's always dust no matter how meticulous you are. And this shot in particular would be difficult without retouching since the reflection on the front suggests a white surface is in front where the camera is. Most "reflective product" shots have a black line down the middle where the camera is. But this product has silver for the logo, so you need white in front for it to pop. I am grateful to have been on some product photo shoots, otherwise lighting this would have been even more of an uphill climb. So many disciplines to master in 3D work. Glad we have the forum. Cheers :smile:
 
That is outstanding!
Is the lipstick material Procedural or an Image?
Would it be possible for you to post your lighting set up (studio) .jas file?

My Best
Jeanny
 
Thanks for the comments. @Jeanny - here is a sample file with one model. The lighting is the same 2 light arrangement from the previous render. For the reflections in the "chrome/silver" I did use an HDRI I downloaded from the internet:

http://www.cgadvertising.com/pages/free-materials/hdr-maps.php

The HDR file I used in the render is "Studio version F"

The LipColor texture is procedural and included in the .jas file. Hopefully the Cheetah file helps answer other questions as well. If not, please chime in and I will do my best to elaborate. Cheers


Attachments

  • Lipstick-sample.jpg
    Lipstick-sample.jpg
    44.4 KB · Views: 408
  • Screen Shot 2015-07-07 at 5.27.45 PM.png
    Screen Shot 2015-07-07 at 5.27.45 PM.png
    111.4 KB · Views: 438
  • LipColor-Sample.jas.zip
    121.7 KB · Views: 436
Last edited:
:D Thank you so much for your .jas file along with the material, explanation,
and link to the advertising web site. (Great HDRI's & Materials)
All your information really helps.

I'm just amazed how you can take the different matt nodes and find the specific lighting
that will create a creamy realistic Lipstick material and reflective Lipstick Tube.

Playing around with a copy of one of your lipstick matts:
Changing the various values of the various nodes to see what happens
helps to better understand what can be created and how it can be achieved.

I'll be darned if I can remember everything and keep from getting confused after a while
so it really helps to have something to refer back to.

The same applies to your lighting set up.

Thanks again

My Best
Jeanny
 
Thanks for sharing the scene!
I was looking at the material and I see you have two noise nodes, that are the same except for the 'Position' parameters. What was the reasoning for that? When I change them, I see no difference in the render.

Thanks!
--Shift Studio.
 

Attachments

  • lipstickNoiseNode.jpg
    lipstickNoiseNode.jpg
    6.8 KB · Views: 385
Thanks for sharing the scene!
I was looking at the material and I see you have two noise nodes, that are the same except for the 'Position' parameters. What was the reasoning for that? When I change them, I see no difference in the render.

Thanks!
--Shift Studio.

Great question. Well, the idea is that I used noise to introduce some reflective particles as sparkle. The actual product also has some darker particles as well. If I use the same noise output, the reflective & darker parts will be in the same place, which would make those darker parts reflective too and not so visible. Creating another noise node and changing the position creates a new pattern for the darker elements so they can be seen as well and are separate from the reflective elements. I hope that helps. Cheers.
 
Great question. Well, the idea is that I used noise to introduce some reflective particles as sparkle. The actual product also has some darker particles as well. If I use the same noise output, the reflective & darker parts will be in the same place, which would make those darker parts reflective too and not so visible. Creating another noise node and changing the position creates a new pattern for the darker elements so they can be seen as well and are separate from the reflective elements. I hope that helps. Cheers.

Yup, that makes sense - Thanks.
I wasn't able to spot before, because I wasn't making changes to the material that was visible - just not paying enough attention to what was going on ;)
 
Beautiful work Rene. Such attention to detail on the lipstick material, scene and lighting. If I was the client's product photographer, I'd be worried (about losing a photo shoot job) and impressed at the same time with what you have achieved here.
 
Back
Top