
You are using an out of date browser. It may not display this or other websites correctly.
You should upgrade or use an alternative browser.
You should upgrade or use an alternative browser.
Scalpel Tool -- Cutting a Hole in a Face
- Thread starter podperson
- Start date
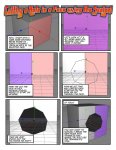
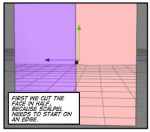
To cut the face in half, did you use the scalpe too?
No, it IMPLIES that you use the scalpel tool but it doesn't actually SAY it.
You could just as easily Ring Cut the mesh or something similar.
Apart from the title it doesn't mention the scalpel tool at all so implication is all we're left with. You could ring cut but then you're adding additional polygons you don't need.
Hi Jerry and welcome.
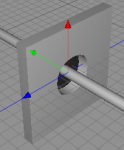
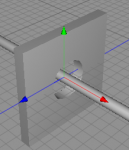
Either you can pull the selected/extruded polygon into your object, or if you want a hole that´s going through the box, make sure you make the same steps (at the same time) on the front&back side of the box. After the last call of Cattmull Clark delete he polygons and use the bridge tool to build a channel from front to back.
With kindest regards
Frank
Attachments
Either you can pull the selected/extruded polygon into your object, or if you want a hole that´s going through the box, make sure you make the same steps (at the same time) on the front&back side of the box.
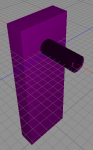
Whoa. I'm not that smart yet. I did not know how to "pull", so I started over and did this...
1. Objects ► Polygon ► Box
2. Adjust to desired thickness, but the plane containing the hole must remain square if you want a round hole.
3. Objects ► Make Editable
4. Switch to Polygon Mode
5. Selection Tool
6. Select a face (turns pink)
7. Tools ► Inner Extrude
Click on face. Extrusion appears
8. Click on face again and again to make smaller extrusions, until you get the size you want. Remember that Catmull-Clark will make it smaller still.
Question 1. Is there a more precise way to do that? What if I need a hole that is exactly a certain size?
9. Tools ► Catmull-Clark Subdivide, several times.
10. Tools ► Extrude. Drag left until it goes all the way through.
Question 2. Is there a more precise way to do that. When you get to the end it quickly turns different colors and I'm not sure where to stop with the mouse.
11. Change to polygon mode.
Change view to look at the bottom of the hole, which is black.
12. Use the Select Tool and select it.
13. Hit the 'delete' key. The hole turns from black to gray, and now you see the lines between the Catmull-Clark subdivisions which were not there before.
14. Click on one of the subdivisions, and drag over the remainder so they all become selected (turn pink).
15. Hit the 'delete' key again. Now, the hole is all clear.
Question 3. I'd like to understand what this "extrusion" is. It does not show in the object browser. What, exactly, is it? Apparently it is actually two things: The thing(s) that got deleted when I hit the 'delete' key the first time, and the thing(s) that got deleted when I hit the 'delete' key the second time. What are these things?
After the last call of Cattmull Clark delete he polygons and use the bridge tool to build a channel from front to back.
It looks like this is not necessary with the method I used. I believe the purpose of this step is to build an inner wall around the hole, but that seems to be already present.
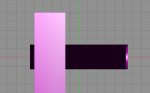
The attachments here show the results up to step 10.
Attachments
Last edited:
Hi Jerry.
Can I send you a small video on this, maybe 2 or 3 MB of weight?
I don´t think I can compress it small enough to be accepted by the forum´s software.
With kindest regards
Frank
Edit: if I read correctly you mixed up 2 things. Going for a complete hole, make sure to delete the tesselated polygons on the front and back side. Now use the "bridge tool" by clicking/selecting 1 point of the edge around the hole on the back and 1 (opposite) point of the edge around the hole on the front side-voilá - there should now apear the pipe.
Last edited:
Hi Jerry.
Can I send you a small video on this, maybe 2 or 3 MB of weight?
I don´t think I can compress it small enough to be accepted by the forum´s software.
Sorry, Frank. Looks like I missed this reply because I didn't notice that the thread had continued onto page 2. But, yes, please send the video. 2-3 MB will probably make it through email if that's what you want to do.
Jerry
Hi Jerry.
I was sending the video 10hs ago.
Nothing received yet?
Frank
I was sending the video 10hs ago.
Nothing received yet?
Frank
I got it, thanks
I got it. You hit night-time here in California. In the morning light, it pretty much explains everything I asked. Thanks very much!
Jerry
Hi Jerry.
I was sending the video 10hs ago.
Nothing received yet?
I got it. You hit night-time here in California. In the morning light, it pretty much explains everything I asked. Thanks very much!
Jerry