help with brick texture node

help with brick texture node

Hi!
at last i've find some time to play with v5 node editor... i'd like to use the brick texture node with random width and depth and to (randomly) slide the brick lines (i guess i have to tweak the "position" value for that but i'd like a different value for each line)
although i (casually) find some nice fx tweaking nodes and parameters i'm far from a decent solution so any help/hint will be very appreciated

thank you in advance,
Alessandro

p.s.: please talk very slow 'cause i'm totally new about this (as you may have noticed:redface: )
 
I appreciate what you're hoping to do but I think it's essentially impossible with the brick texture.

You could "warp" the bricks by feeding noise into its position inputs, but that's not what you're asking for.

Voronoi is good for producing "cobble" or "stonework" type textures.

Note: I realize that when I say something is impossible this means Frank will post a solution within an hour ;-)
 
so the Brick node is actually a Tile node (please correct me if i'm wrong). i guess we need some kind of Offset parameter in it to achieve a real brick look like the thumbnail preview (let's forget about the random width/depth for now... i was trying to make a parquet texture).

btw the silence from Frank seems to confirm what you've stated, podperson :wink:

nevertheless i'm loving this feature and i wish i could learn how to use it pretty soon:smile:
thank you for the answer
regards,
A
 
The brick texture creates offset tiles (fixed offset). It's not very wonderful on its own, but mix in some noise and you can produce pretty nice looking (if somewhat insanely well-laid) bricks.

The tricks are:

1) Using noise to vary the color a bit.
2) Using noise to create a bump map.
3) Using two variations of (or one variation + filters) of the brick so that the bump map (which needs to be a bit blurred to make the mortar look right) and colors (which need to be sharply defined since brick is one color, mortar another, and they don't mix) come out right.

But I agree that being able to vary the line widths and the offsets a bit would do a great deal for verisimilitude.
 
shifted bricks

i've been tweaking this all night but no decent solution.
with no color (painted) and from distance it works though.

View attachment paintedbricks.c3dmat.zip

Untitled.jpg
 
thanks archie,
as you said not a definitive solution but some steps forward... i have to take a deeper look and try to understand your nodes :smile:

cheers,
A
 
i have to take a deeper look and try to understand your nodes

i based it on the cellnoise because intuitively the patterns match, but i think it should be blurred horizontally, maybe normal noise with an abs function on the vertical vector is the way to go.
(i was not able to figure out the multiplyadd, is it (a+b)*t or a*b+t or what and how to find out by watching a result in the diffuse channel ??)
 
Last edited:
success !

now i've finally figured out how to shift bricks, only it does not help much.

basically it's done by scaling the cellnoise till you get horizontal stripes of a brick's size and then feed it without the height component into x and z position of the brick node, so that each row gets shifted by a different amount of grey (adjusting it via the colors of the cellnoise).
then adding some turbulence to the position for rough edges and to the bumpmap for rough surface.
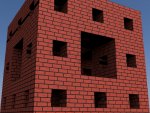
this works well on a plane, but once you apply it to a 3d model you get weird thin bricks at the corners and because the material is 3d nicely shifted bricks mean that likely on some row mortar material will appear (see weird dark stripes above).
the last problem is, the brick material refuses getting increased on the bumpmap. when you apply a multiply node and crank it up, the bump doesn't change. if you do this with fractals it works.
anyone knows how to deal with this ?
i'm at my limits now.

View attachment shiftedbricks.c3dmat.zip

Untitled2.jpg
Screen shot 2009-10-30 at 10.34.05 PM.png
 
Last edited:
small progress

my last version was a 3d-material showing the problem that when a mortar joint happens to appear at the end of the geometry, the grout is shown instead of a brick line on the other side, which is quite logical a behavior of a 3d mat.
so i changed all the nodes from 3d to uv, including the mat tag, and -
nothing happened.
then i dropped the z-connection to the float2vec node and it worked.
it should now behave as a 2d material wrapped around the object according to the uv-mapping (in most cases simply cubic).
the remaining problem is now the thin bricks at some edges, how to get rid of i have no clue.

View attachment shiftedbricks1.c3dmat.zip
Untitled.jpg


i think a mason will start with a regular pattern at every edge and after say two bricks distance start shifting, a behavior not possible to simulate with nodes.
but now with deletable edges in cheetah it should be possible to mimic this with geometry, if all walls were made from quads of the right height every second vertical row could be selected by loop and then every second horizontal deselected by ring, then delete.
once the regular brick pattern is established, rows could be sequentially selected and shifted and then a wireframe node based texture applied.
but for the moment i'm not going into that :tongue:
 
Edges on material.

Please see attached Images.

I have added a box for the wall and another box and used a boolean to create a hole in the wall.
1. Is this the best way to do this ?

I have added the material to the materials folder.

I dragged the material onto the wall and UVscaled 15 : 15. (this gives the bricks the correct size.
But the returns show a smaller brick size.

2. How do I adjust this section.

3. How do I get a 'deeper' bump map (ie get the motar to be below the brick and a bit more roughness to the brick).

Cheers

SteveW
 

Attachments

  • BricksTest.png
    BricksTest.png
    152.8 KB · Views: 264
Back
Top