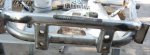
Go Cart Frame

Go Cart Frame


This has been in my head for some time, and it turned
out to be a great exercise in precision tube joinery.

A side was built first- The top tube is set at a 3 degree
slope so I made "T's" at 90, 87, 45 and 42 degrees.

Then the sides are angled at 12 degrees and the front and back tubes are created.


Attachments

  • Go Cart Frame.jpg
    Go Cart Frame.jpg
    105.5 KB · Views: 701

Me to Jeanny, :rolleyes: 
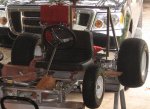
I just mocked up some wheels to see how it might look.

Until I add wheels or a seat, the scale is undetermined.
With little wheels, it has that go cart look.


Attachments

  • Go Cart Frame02.jpg
    Go Cart Frame02.jpg
    119.7 KB · Views: 605
Hi Zoo
Thought I’d throw this out just in case it may spike your or anyone's interest.
If not. . . nothing gained - nothing lost.
My husband started building a Go cart a few years ago. He wanted to design one that was souped-up, unusual, different then most.
He wanted to use a vintage 12½ HP Briggs and Stratton motor that my Dad had given him.
The difficulty of weight balance came in to the picture which he hopped he could eventually solve.
Suggestions were made to put a counter weight on the front of the cart as most of the weight was on the back (Motor, and passenger)
Never-the-less the project is temporarily on the shelf.
Thought it may be a fun project to work on during the winter to create the Go Cart in Chetah3D and
use a Relief Parametric object to create a terrain that the Go Cart could be animated to race over.
I’ve attached a photo of it.
 

Attachments

  • Go Cart.JPG
    Go Cart.JPG
    210.5 KB · Views: 565
My husband appreciated your compliment. Unfortunately we don’t have too many pictures of different views and my husband tore most of it down to start over. We have a few close ups of various angles of the basic frame it self. My husband felt fortunate to have the frame. It was a “JRKART” made in Belgium.

I've attached photos of the Basic frame that he started with and two more other shots that aren't much different from the first photo I posted.
 

Attachments

  • Frame 1.JPG
    Frame 1.JPG
    191.8 KB · Views: 528
  • Frame 2.JPG
    Frame 2.JPG
    245.4 KB · Views: 537
  • Go Cart 2.JPG
    Go Cart 2.JPG
    288.9 KB · Views: 531
  • Go Cart 3.JPG
    Go Cart 3.JPG
    175.6 KB · Views: 526
Very nice to see you're able to bring it to life in the real world also. Must be a blast to ride a go cart of your own creation. :icon_thumbup:
 
Well, hopefully you don't live too far away and he'll let you borrow the go cart for a spin around the track. If not, great design and recreation either way. :smile:

Jeanny, great, unique Go Cart your husband has engineered. Have you been able to drive it around yet?
 
Last edited:
Hi Sid
My husband appreciated your compliment.
He tried running it but ran into trouble with side push when trying to steer it.
He said it was possibly caused by weight differential or the 12 ½ Horse power motor was too powerful for it.
I didn't realize he didn't just put the project on the shelf but disassembled it and all he has left is the motor.
I still think it would make a cool Cheetah project and Helmut's post is a good tut to make the cart run.

run.http://www.cheetah3d.com/forum/showpost.php?p=91197&postcount=3

Cool. Thanks for the details on the engine.
Sorry to hear it's been disassembled, but then again, it sounds like he has a plan to make it even better this time, learning from his past design. :cool:
 
Back
Top